Tuesday, July 31, 2018

Mobile networks have added 10.6 million more users in one year, PTA

According to the latest statistics issued by Pakistan Telecommunication Authority (PTA), cellular companies have added 10.6 million new users during the last one year as subscribers base now touched the mark of 150.24 million till June 2018.

Four big mobile operators providing cellular services have added 873,00 users per month to their networks due to which the sector showed a tremendous growth. According to PTA, the number of total mobile phone subscribers was 139.75 million and teledensity was 72.35 percent in June 2017 has now touched 74.11 percent mark till June 2018 as 10.6 million have been added to the group.

Besides that, the number of cellular subscribers was around 120.2 million during 2011-12 and reached 127.7 million in 2012-13 which is further increased to 140 million in 2013-14. But, with the introduction of biometric verification, the number of subscribers dropped to 114.7 million during 2014-15, the trend saw an increase in subscribers rose to 133 during 2015-16 and during 2016-17 the number of subscribers continued to increase, reaching the mark of 139.8 million.

If we see individual subscribers count of one of leading mobile phone operator Mobilink (Jazz) has reached 55.469 million in June 2018 from 52.47 million till June 2017, increasing 2.999 million new subscribers during one year. This means Mobilink is the leading mobile network in Pakistan. Meanwhile, the number of Ufone subscribers which was 18.397 million in June 2017 has now reached 20.314 million till June 2018 grabbing 1.717 million new subscribers in one year.

The subscribers of China Mobile Pakistan Zong have reached to 30.89 million (June-2018) from 28.084 million in June-2017. Zong has added 1.806 million subscribers in one year. While the total number of Telenor’s subscribers have reached 43.564 million in 2018 which was 40.804 in June 2017. In one year the Telenor added 2.76 million new users to its network.

The post Mobile networks have added 10.6 million more users in one year, PTA appeared first on TechJuice.


Uber extends insurance coverage across Pakistan

UBER

Uber has today announced it will provide all driver-partners, with an insurance product, known as ‘Injury Protection’ across Pakistan in collaboration with Chubb Insurance, a global insurance leader. Key to the product is the ability for drivers to be protected from the financial cost of injury, including medical expenses and lost earning opportunities up to certain limits, if an accident takes place while driving on the Uber app. This announcement forms part of Uber’s global commitment to driver-partner protection and the safety and security of its customers and will be funded by Uber at no cost to driver.

As of today, all driver-partners including rickshaw and motorcars/cycles will be  covered for emergency medical treatments as part of ‘Injury Protection’ program

Uber driver-partners, including those on the popular UberMoto and UberAuto, are automatically enrolled via an in-app message; from the moment they accept a trip or delivery request, while driving to pick up a rider or on the way to a restaurant, and until the trip ends or delivery is completed. Participation is not compulsory, and partners are able to opt-out if they wish. All passengers are also automatically protected by the injury protection insurance.

Commenting on the partnership, Pierre Dimitri Gore Coty, Head of Uber for Europe Middle East and Africa stated,  “Driver-partners have told us that they enjoy the freedom of being their own boss and choosing if, when and where they drive. But they have also told us they want more security and the Injury Protection program is designed to provide Uber driver-partners with peace of mind while preserving the flexibility they value. We believe that we have an important role to play in empowering people to get access to quality economic opportunities and we are excited to have developed a leading insurance product for the ride sharing industry here in Pakistan.”

“This collaboration with Uber to provide driver-partners with an innovative insurance product is part of our commitment to supporting efforts around digital transformation and providing consumers with peace of mind in emerging markets,” said Giles Ward, Regional President for Eurasia & Africa at Chubb Insurance

This new product covers all eligible driver-partners in Pakistan for major costs resulting from accidents or injuries that occur on trip up to certain limits.

Injury Protection commences from 1 August, 2018 and will instantly cover more than 50,000 active independent Uber driver-partners across Pakistan. This is an important step in addressing some of the biggest concerns raised by the driver-partners that use the Uber App.

The ride-hailing app continues to develop, collaborate and launch initiatives in an effort to provide more support to its driver-partners and riders in Pakistan and in other countries it operates. Some of these include facilitating anti sexual harassment training, and hosting listening tours to capture feedback and concerns from local community organizations.

Uber recently expanded its operations in Pakistan by introducing its affordable uberMOTO service in nine cities after it saw booming demand for the bike service.

The post Uber extends insurance coverage across Pakistan appeared first on TechJuice.


Dell Introduces the New G-Series in Pakistan with Intel 8th Gen core processors in partnership with Pakistan Rugby Union

Dell Pakistan

Committed to providing the ultimate gaming experience for everyone, Dell announced the launch of its new Dell G Series, in association with the Pakistan Rugby Union. Revitalizing the Dell’s gaming portfolio this suite of PCs is designed and engineered for the gamer who prioritizes performance and excellent gameplay.

Delivering gaming solutions for players of all levels and budgets, Dell has launched an expansive new suite of Windows 10 gaming PCs.  The systems, Dell G3 15 and G7 15, feature gaming-forward design and snappy performance at affordable prices. These new game-ready laptops are equipped with powerful NVIDIA GeForce GTX, 8th Gen Intel® Core processors, thermal management solutions, intelligent content prioritization software, anti-glare IPS panels, and other complimentary features intended to get gamers fully immersed into their games.

POSM_Artwork

Speaking at the event Naveed Siraj, Country General Manager for Pakistan and Afghanistan said “We are excited to launch the Dell G Series and further strengthen the Dell gaming portfolio in Pakistan.  We are committed to bringing best-in-class technology so that our valued customers have a richer and more immersive gaming experience at every price level.  Today’s launch further enhances our portfolio of award-winning products and we are confident that consumers in Pakistan, especially our youth will enjoy the performance and price of Dell G Series of gaming notebooks.”

Representing the Pakistan Rugby Union, the Head of Media, Salman Sheikh commented “We are proud to be associated with Dell Pakistan for the launch of the Dell’s new G Series gaming laptops. Having positioned rugby with discipline, character building, progress & power hallmarks of sportsmanship, Dell recognizes the diversity of the gaming ecosystem and the evolving needs of modern gamers and we are pleased to be affiliated with their gaming brand.”

Choosing rugby as the face to showcase their new gaming notebooks will not only open new avenues for the game in Pakistan but will also allow the Pakistan Rugby Union to introduce their stars and the game to the youth of the country.

Dell also recently raised the bar when it comes to support, introducing its top-tier consumer support service, Premium Support Plus. Powered by Dell’s exclusive SupportAssist technology, it is the first and only consumer service to find issues proactively, predict problems before they start, remove viruses automatically and optimize performance for consumer PCs. Premium Support Plus is available for all Dell G Series, in addition to XPS and Inspiron PCs.

The launch was announced at an internal event held at the Dell Pakistan office in the presence of the Pakistan Rugby Team.

Further specifications:

Dell G3 15

  • The laptops 2×2 WiFi antenna design provides great wireless performance, while the SmartByte software prioritizes gaming and video content keeping them smooth, even during large file downloads
  • All encased in a refined performance inspired design and a silky matte exterior finish, the laptops boast a sleek 22.7mm (15) / 25mm (17) profile encouraging gaming-on-the-go
  • G3 15 is Dell’s thinnest gaming laptop to date
  • Dell G3 15 will offer two color options (Black, Alpine White)

Dell G7 15

  • G7 15 will offer optional 8th Gen Intel® Core™ i5 and i7 CPU and UHD display (3840×2160) configurations
  • Killer 1×1 networking optimization (supporting up to 2×2) or SmartByte software responsively prioritize content downloads for liquid smooth gaming and streaming
  • Designed to push heat and noise away from the user, Dell equipped a front air intake and rear exhaust vent to the laptops’ frames to keep players cool, and able to game longer
  • Immersing players deeper into the game, Dell G7 15 will also offer an optional IPS UHD 4k panel to summon a premium on-screen experience
  • Dell G7 15 is available in either Standard Black or Alpine White

Availability

The latest Dell devices are available for purchase through Dell authorized distributors and resellers in the market.

The post Dell Introduces the New G-Series in Pakistan with Intel 8th Gen core processors in partnership with Pakistan Rugby Union appeared first on TechJuice.


San Francisco based game studio launches Pakistan studio with USD 6.5 million investment

Cloudcade

San Francisco based mobile game developer and publisher, Cloudcade Inc. has announced the launch of Cloudcade Pakistan studio with an investment of PKR 800 million (USD 6.5 million) that will be spread evenly over the period of next three years.

As an emerging software hub, Pakistan will house this brand new development studio that is an extension of Cloudcade San Francisco studio. Cloudcade Inc. has appointed the co-founder of the popular Caramel Tech Studios, Ammar Zaeem as the President of Studios, South Asia. With his vast experience of building and managing game development studios, Zaeem will be leading Cloudcade Pakistan that currently boasts a team of 50 engineers, artists, and QA professionals. Cloudcade Pakistan is also the first Asian studio to be set up by Cloudcade Inc.

“We’re thrilled to welcome Ammar and the entire Pakistan team to the Cloudcade family,”

said Jeffery Kong, President of Studios, North America at Cloudcade.

“We’ve had a great relationship working together on multiple key projects, and they’ve proven themselves as capable and thoughtful partners.”

Cloudcade Pakistan will be one of the multiple upcoming studios that Cloudcade will establish to further its business as both a global developer and publisher. Through this expansion, Cloudcade is positioning itself for the next chapter of international mobile gaming success, with the ultimate goal of establishing itself as a publishing powerhouse that bridges the gap between the Asian and Western markets.

“We’re excited to announce the creation of Cloudcade Pakistan as the first Cloudcade studio in Asia,”

said Di Huang, CEO at Cloudcade.

“This studio gives us the ability to serve customers around the world and provides firepower for both our development efforts and publishing partnerships by effectively lowering development costs with high quality.”

Ammar Zaeem

Ammar Zaeem, President of Cloudcade South Asia.

Ammar Zaeem feels this investment will make more studios comfortable to invest in Pakistan which in return create more jobs. It will also help people understand the industry further and overall create a better name for the country when it comes to tech. Speaking to TechJuice, he added,

“I also feel this won’t only be restricted to games. It will pave ways for other tech companies to have people come down here and understand the value of investing in Pakistan right now as arguably the fastest emerging market.”

This investment is no small feat for the local tech and startup industry that continues to evolve in its nascent stage. It is the first time, a strategic international investment of this scale has been injected into the local game development arena. Cloudcade Pakistan will not only set the momentum to gain traction of international investors but also become a hub for honing local engineering talent.

The post San Francisco based game studio launches Pakistan studio with USD 6.5 million investment appeared first on TechJuice.


MySQL Updates for Ubuntu Resolve Server Data Manipulation and DoS Vulnerabilities

Fifteen medium priority vulnerabilities have been found in the Server and Client components of Oracle MySQL platform. The vulnerabilities have been allotted the CVE labels CVE-2018-2767, CVE-2018-3054, CVE-2018-3056, CVE-2018-3058, CVE-2018-3060, CVE-2018-3061, CVE-2018-3062, CVE-2018-3063, CVE-2018-3064, CVE-2018-3065, CVE-2018-3066, CVE-2018-3070, CVE-2018-3071, CVE-2018-3077, CVE-2018-3081. Exploitation of these vulnerabilities requires that the attacker obtain network access via multiple protocols to compromise the MySQL server.

CVE-2018-2767 (CVSS 3.0 Base Score 3.1) impacts the Server:Security:Encryption subcomponent affecting versions upto 5.5.60, 5.6.40, and 5.7.22. If the vulnerability is exploited, it can allow unauthorized read access to the attacker.

CVE-2018-3054 (CVSS 3.0 Base Score 4.9) impacts the Server:DDL subcomponent. It affects all versions upto 5.7.22 and 8.0.11. This vulnerability is easily exploitable, and it allows an attacker to be able to repeatedly crash the system with a DoS.

CVE-2018-3056 (CVSS 3.0 Base Score 4.3) impacts the Server:Security:Privileges subcomponent. It affects all versions upto 5.7.22 and 8.0.11. The vulnerability has been ruled as easily exploitable, giving the attacker unauthorized read access to a subset of MySQL Server readable data.

CVE-2018-2058 (CVSS 3.0 Base Score 4.3) impacts the MyISAM subcomponent. It affects versions upto 5.5.60, 5.6.40, and 5.7.22. The vulnerability is assessed to be easily exploitable, granting an attacker unauthorized update, insert, or delete access to MySQL server data.

CVE-2018-3060 (CVSS 3.0 Base Score 6.5) impacts the ImoDB subcomponent. It affects versions upto 5.7.22 and 8.0.11. It is easily exploitable and a successful exploit allows an attacker to create, delete, or modify critical Server data as well as repeatedly crash the system with a complete DoS.

CVE-2018-3061 (CVSS 3.0 Base Score 4.9) impacts the DML subcomponent. It affects versions upto 5.7.22. The vulnerability Is easily exploitable and allows for a repeated DoS crash.

CVE-2018-3062 (CVSS 3.0 Base Score 5.3) impacts the Memcached subcomponent. It affects versions upto 5.6.40, 5.7.22, and 8.0.11. The vulnerability is difficult to exploit but a successful attack can allow a frequently repeatable DoS crash of the server.

CVE-2018-3063 (CVSS 3.0 Base Score 4.9)  impacts the Server:Security:Priveleges subcomponent. It affects versions upto 5.5.60. It is easily exploitable and allows for a complete DoS frequently repeatable crash.

CVE-2018-3064 (CVSS 3.0 Base Score 7.1) impacts the InnoDB subcomponent. It affects versions upto 5.6.40, 5.7.22, and 8.0.11. It is easily exploitable and allows a low privileged attacker to update, insert, or delete server data and cause a DoS crash repeatedly.

CVE-2018-3065 (CVSS 3.0 Base Score 6.5) impacts the DML subcomponent. It affects versions upto 5.7.22 and 8.0.11. Exploit allows repeated DoS crash.

CVE-2018-3066 (CVSS 3.0 Base Score 3.3) impacts the Server:Options subcomponent. It affects versions upto 5.5.60, 5.6.40m and 5.7.22. The difficult to exploit vulnerability allows read, update, insert, or delete access to server data.

CVE-2018-3070 (CVSS 3.0 Base Score 6.5) impacts the Client mysqldump subcomponent. It affects versions upto 5.5.60, 5.6.40, and 5.7.22. Exploit allows for repeatable DoS crash.

CVE-2018-3071 (CVSS 3.0 Base Score 4.9) impacts the Audit Log subcomponent. It affects versions upto 5.7.22. Exploiting this vulnerability allows an attacker to cause repeatable DoS crash.

CVE-2018-3077 (CVSS 3.0 Base Score 4.9) impacts the Server:DDL subcomponent. It affects versions upto 5.7.22 and 8.0.11. Exploit allows repeatable DoS crash.

CVE-2018-3081 (CVSS 3.0 Base Score 5.0) impacts the Client programs subcomponent of the MySQL Client component. It affects versions upto 5.5.60, 5.6.40, 5.7.22, and 8.0.11. The vulnerability is difficult to exploit but if exploited allows for update, insert, or delete access to MySQL Client accessible data as well as the ability to cause repeatable DoS crash.

As per the advisories (1 / 2) posted on the Ubuntu website, to resolve the threats posed by these vulnerabilities, package updates have been released for the respective Ubuntu versions. The update mysql-server-5.75.7.2.3-0ubuntu0.18.04.1 is for Ubuntu 18.04 LTS and mysql-server-5.75.7.2.3-0ubuntu0.16.04.1 is for Ubuntu 16.04 LTS. The update for Ubuntu 14.04 LTS and Ubuntu 12.04 ESM is mysql-server-5.55.5.61-0ubuntu0.14.04.1 and mysql-server-5.5 – 5.5.61-0ubuntu0.12.04.1. These updates are available on the website for download and install directly.

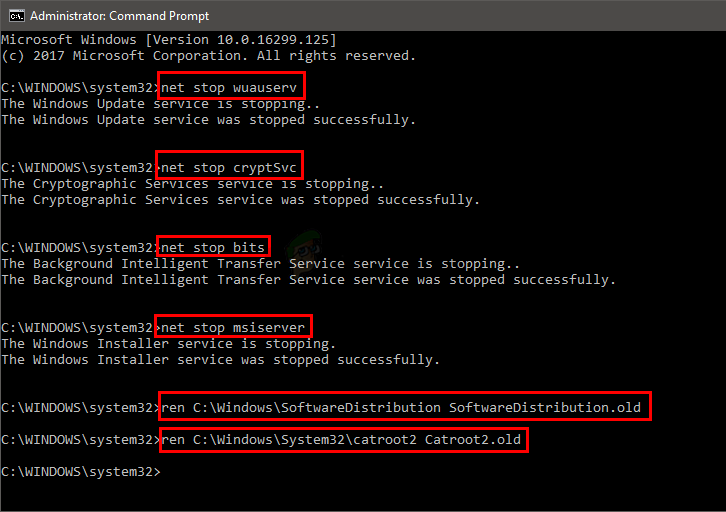
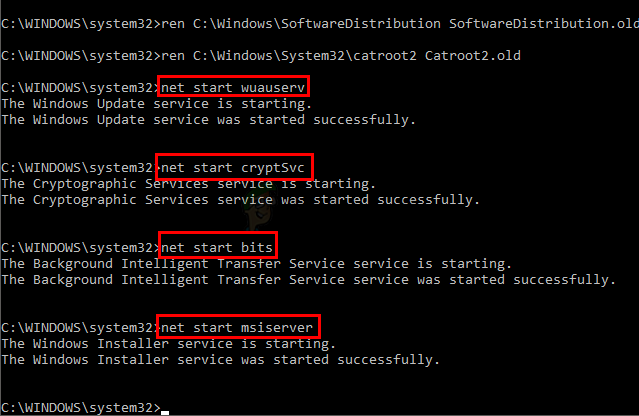
You can also open the Update Manager for desktop and check the pending updates under the settings tab. Clicking on the updates and proceeding to install will apply the patches. On an update-notifier-common package for a server, you can check for updates with the following: “sudo apt-get update” and “sudo apt-get dist-upgrade”. Allowing permissions to proceed with the updates lets them install directly.

The post MySQL Updates for Ubuntu Resolve Server Data Manipulation and DoS Vulnerabilities appeared first on Appuals.com.


Microsoft Wireless Display Adapter V2 2.0.8350 Found Vulnerable to Wireless Eavesdropping

Microsoft Wireless Display Adapter V2 has been diagnosed with three vulnerabilities: command injection vulnerability, broken access control vulnerability, and evil twin attack vulnerability. The first vulnerability has only been tested on the Microsoft Wireless Display Adapter V2 software versions 2.0.8350 to 2.0.8372 and has been found to impact all the versions in this range. The broken access control and evil twin attack vulnerabilities have been found to affect only the software version 2.0.8350 in the tested range. Other versions of the software were not tested, and the vulnerabilities have not been exploited yet. The command injection vulnerability has been assigned the label CVE-2018-8306, and it has been given a relatively moderate risk assessment.

The Microsoft Wireless Display Adapter is a hardware device that allows the broadcasting of screens from Miracast enabled Microsoft Windows devices. The mechanism utilizes the Wi-Fi Direct connection and the Miracast audio/video transmission channel to broadcast the screen. The process is WPA2 encrypted as per the encryption of the Wi-Fi connection in use for added security.

In order to pair the device with the display, the mechanism offers both a push button connection as well as a PIN connection. Once the connection is established, the device does not need to be verified for every subsequent connection.

Continuing with this previously achieved authorization, a command injection vulnerability can occur when the name of the display adapter is set in the “NewDeviceName” parameter. Creating a situation where characters escape the command line scripts, the device is set into a boot loop where it stops functioning properly. The affected script for this vulnerability is the “/cgi-bin/msupload.sh” script.

The second vulnerability, broken access control, can occur when the push button configuration method is used for device pairing, only requiring that the device be in wireless range without any need for physical access to it for PIN verification. Once the first connection is established in this manner, subsequent connections do not need verification, allowing a compromised device to have unrestricted control.

The third vulnerability, evil twin attack, occurs when an attacker manipulates a user into connecting to his or her MSWDA device by being connected to the rightful MSWDA and only putting out the attacker’s own MSWDA for the user to connect to. Once the connection is established, the user will not know that s/he has connected to the wrong device and the attacker will have access to the user’s files and data, streaming the content on his/her device.

Microsoft was initially contacted on the 21st of March regarding this set of vulnerabilities. The CVE number was assigned on the 19th of June and the firmware updates were released on the 10th of July. Since then, Microsoft has just now come forward with its public disclosure advisory. The vulnerabilities collectively impact versions 2.0.8350, 2.0.8365, and 2.0.8372 of the Microsoft Wireless Display Adapter V2 software. Security updates labelled as “important” by Microsoft are available for all three versions on their website as part of the security bulletin published. Another mitigation suggested requires that users open the Microsoft Wireless Display Adapter Windows application and check the box beside “Pair with PIN Code” under the “Security Setting” tab. This ensures that physical access to the device is required to view its screen and match the PIN codes ensuring that an unwanted wirelessly reachable device does not easily connect to the setup. The vulnerabilities impacting the three versions were given a CVSS 3.0 base score of 5.5 each and a temporal score of 5 each.

The post Microsoft Wireless Display Adapter V2 2.0.8350 Found Vulnerable to Wireless Eavesdropping appeared first on Appuals.com.


myTube! gets a new update for Windows Windows Mobile and Xbox

MyTube rolls out a new update for Windows, Windows Mobile and Xbox users. The latest update bumps the app to v3.3.1 and brings the following new features:

  • myTube Rooms ( beta ) – With this new feature you can share a video and chat with friends.
  • Private mode – Activated by the settings, the watched videos will not appear in the Timeline or in the history.
  • Cinema mode (PC).
  • Watched videos appear in the Timeline (PC).
  • Manual language selection enabled.
  • Minor changes to the Reveal effect and the button template.
  • New animation when you hover over the cover of a video (PC).
  • Now you can pinnate a single video (PC and Mobile) to the Start menu.
  • You can queue videos like on Xbox (PC and Mobile).
  • Added the ability to exit the TV mode and use the PC interface (Xbox).
  • Enabled the sharing button (Xbox).
  • Added support for the Reveal effect (Xbox).
  • Lots of bugs fixed and various improvements.

You can download the new update from the Microsoft Store Here. Do let us know your thoughts in the comments section below.

The post myTube! gets a new update for Windows Windows Mobile and Xbox appeared first on Appuals.com.


Common Fedora Workstation Crashes Traced Back to GNOME JavaScript Extensions

A recent spate of Fedora Workstation crashes and other issues with the GNOME Shell has been traced back to GNOME Shell extensions written in JavaScript, as discovered by GNOME developer and Red Hat engineering manager Jiri Eischmann.

Being able to write GNOME Shell extensions in JavaScript has been regarded as an interesting concept with a low barrier to entry, but it appears that it is in fact causing problems for users within the GNOME desktop environment. Even worse yet is that the current GNOME Shell environment defaults to Wayland with the Mutter compositor, so it takes some pretty hard crashes, compared to GNOME X.Org sessions that have the occasional blank screen or similar issue.

Fortunately, Jiri Eischmann has a few ideas to improve this situation, which can be summed up as:

  1. Extensions used to be disabled when the Shell crashed hard (couldn’t be restarted). Since on Wayland it’s the result of every crash, we should do that after every GS crash. And when the user goes back to GNOME Tweak Tool to enable the extensions again, she/he should be told that it was mostly likely one of the 3rd party extensions that made the desktop crash, and she/he should be careful when enabling them.
  2. Decoupling GNOME Shell and Mutter or/and other steps that would bring back the same behaviour like on Xorg: GS crash would not take everything down. This would require major changes in the architecture and a lot of work and GNOME Shell and Mutter developer community has already a lot on their plates.
  3. Discontinuing the unlimited extensions, introducing a limited API they can use instead of hot patching the GS code itself. This would be a very unpopular step because it’d mean that many of the existing extensions would be impossible to implement again. But it may become inevitable in the future.

The post Common Fedora Workstation Crashes Traced Back to GNOME JavaScript Extensions appeared first on Appuals.com.


Descenders The Ring Of Fire Update Takes Riders into a Volcano Next Week

Extreme downhill freeriding game Descenders is scheduled to receive a significant content update. Released in February 2018, the fast-paced biking game by RageSquid is going to receive its ‘hottest’ update yet. The Ring Of Fire update will be launched on 7th August and brings with it a new world, new freeride options and loads of cosmetics.

The Ring Of Fire

Currently, there are four playable maps in Descenders: Highlands, Forest, Canyon and Peaks. With The Ring Of Fire update, a fifth world titled Volcano will be available. Volcano is based off the real life Pacific Ring of Fire area and will be unlike any other world as it kicks up the difficulty by introducing ‘tectonics’. Navigating through the tectonics during earthquakes will be an extraordinary challenge, and the lava does not help. To unlock Volcano, players will have to complete a special requirement on Peaks. The developers dropped a fairly vague hint as to how to unlock it. “Just keep an eye out for those Rings of Fire,” reads the announcement post.

As of now, there are two bonus levels in Descenders, one on Highlands and the other in Peaks. With the Ring Of Fire update, another location now hides a secret bonus level. It will most likely be in the Volcano world, but we will have to wait as players eventually locate it.

Descenders features a sandbox mode called Freeride where players can practice their skills and perform stunts. Now in Freeride mode, players have full choice over their selection of crew members for a specific level. As for all the customization addicts out there, the new update also adds a bunch of new cosmetic items that can be unlocked. These new items can be applied to your bike and rider, provided you have unlocked them first.

The Ring Of Fire update for Descenders is due next week on 7th August. 

The post Descenders The Ring Of Fire Update Takes Riders into a Volcano Next Week appeared first on Appuals.com.


Create Your Own Religion in Godhood Which Launches Next Year

The latest title from Abbey Games is set for launch next year. The studio based in the Netherlands are responsible for Reus and Renowned Explorers and have unveiled their next video game. Godhood is a strategy game in which players take control of a newborn deity in order to create and grow their religion. The first teaser trailer for the game is out now:

Godhood

The trailer gives us a preview of many of the games features packed into a beautiful hand-drawn art style that we have seen in Reus and Renowned Explorers. In Godhood, players play the role of a young god, create their religion and look after their loyal followers. While the player has no direct control over the actions of their followers, they can influence them by various methods. Prophets can be sent, monuments can be built and selecting virtues will affect the choices made by the followers.

When creating a religion, it is up to the player to select the rituals, virtues and vices of the followers. Guiding the followers by deciding which rituals to perform, managing abilities and powers and constructing monuments are all ways to make your religion flourish. Just like the player, there will be other deities and you will have to fight your rivals for power and influence. In ritual fights, properly known as Sacraments, the player must send their most powerful warrior to fight in their religion’s name.

Godhood is Abbey Games’ third project and is set to release in 2019. Their first two titles, Reus and Renowned Explorers, were both highly successful strategy games released in 2013 and 2015 respectively. As both games feature a colorful art style and are part of the strategy and management genre, Abbey Games’ direction with Godhood seems clear-cut. Currently, Godhood is expected to be released on the PC sometime next year. To learn more about Godhood, check out their website.

The post Create Your Own Religion in Godhood Which Launches Next Year appeared first on Appuals.com.


What is: sppextcomobj.exe

sppextcomobj.exe is a legitimate Windows file developed by Microsoft. It is a part of the Windows Operating System. sppextcomobj.exe is used for Key Management Service (KMS) Licensing for Microsoft Products and installed with Windows File Protection (WFP) enabled. That’s why sppextcomobj.exe is run as a standard windows process and has Network Service privileges. You will usually find this file with the name KMS Connection Broker in task manager. The typical file path for this is C:\Windows\System32\sppextcomobj.exe.

If you are one of those users who keep a very close eye on the services running on their Windows then you might have seen sppextcomobj.exe or KMS Connection Broker in the task manager. You will see this executable file continuously running the background. A lot of users are concerned about this service/file running in the background since it seems a bit suspicious and there isn’t a lot of information about this on the internet.

First things first, sppextcomobj.exe isn’t a virus or malware that you have to worry about. This is the first thing that people ask whenever they see an unknown service running in the background. But, if sppextcomobj.exe is taking up a lot of resources and slowing down your whole computer then that might be a bad sign. So, if sppextcomobj.exe isn’t taking up a lot of system resources then you should be good to go.

Why does sppextcomobj.exe keeps running in the background?

If you are wondering why does sppextcomobj.exe or KMS Connection Broker keeps running in the background then the answer is Windows and Windows products. The KMS Connection Broker or sppextcomobj.exe is responsible for the activation of Microsoft products. This includes your very own Windows and various other Microsoft products like Microsoft Office etc. So you shouldn’t be worried if you find this service running in the background.

What if my Antivirus considers sppextcomobj.exe a threat?

If your antivirus application or your Windows Defender is catching the sppextcomobj.exe as a threat to your system then ignore that. As we mentioned earlier, unless sppextcomobj.exe or KMS Connection Broker is taking up a lot of resources, or creating a major issue and error problem, you should be ok. Removing these files will cause serious side effect so it isn’t recommended.

Should I Disable sppextcomobj.exe?

A lot of people are in favor of disabling the KMS Connection Broker or sppextcomobj.exe service all together. Again, this isn’t a good idea to disable this service since it is responsible for the activation of your Microsoft products. You might experience issues with the activation and licensing of your products, especially the Microsoft products, after disabling this service.

The post What is: sppextcomobj.exe appeared first on Appuals.com.


What is: Virtualapp/Didlogical

Credential Manager is Windows Desktop App. The main purpose of this app is to let Windows store usernames, passwords, and addresses on your system. So, whenever you create a new account on Windows or create an account on a website, your credentials will be saved in the Credential Manager. You can open the Credential Manager (via Control Panel) and look at the accounts saved in the Credential Manager. Credential Manager is not only used by Windows but it is also used by other apps that require your private data to be stored locally. Apps like Skype, File Explorer, Microsoft Office, etc. uses this Credential Manager to store and access your account information. Your accounts are stored in 4 different categories: Windows Credentials, Certificate-Based Credentials, Generic Credentials, and Web Credentials.

A lot of users have complained about an unknown account listed in their Credential Manager. This credential is stored by the name of virtualapp/didlogical. If you try to look at the details of this credential, you’ll notice a weird username with a password stored in your Credential Manager. Usually, virtualapp/didlogical will be the name of the Internet or Network Address and this credential will be stored under the Generic Credentials category. It will look like this

You’ll also notice that you cannot technically remove the virtualapp/didlogical credential as well. You will be able to remove the credential by clicking on the Remove and following the on-screen instructions but it will be back in the list of Credentials after a reboot or after a small amount of time. So, you won’t be able to remove it completely.

Is virtualapp/didlogical safe?

Since virtualapp/didlogical credentials are made automatically and you won’t be able to remove it, it will look like it’s a malware that comes back on its own. But, fortunately, virtualapp/didlogical isn’t a malware at all. It is a legitimate credential and it is stored by Windows whenever you use one of the Windows Live Products. So, if you use any one of the Windows Live Products like Windows Live Messenger, Windows Live Mail, Windows Live Sign-In Assistant, and other Microsoft services, then these products will make this credential in your Credential Manager. This means that you don’t have to worry about it.

How to remove virtualapp/didlogical

You can easily remove the virtualapp/didlogical credential as well. But, as mentioned above, it might come back on its own. If you don’t want this credential to appear in the Credential Manager then you will have to stop using Windows Live Products. Using any one of the Windows Live Products will most likely trigger the credential initiation and you’ll start seeing the virtualapp/didlogical credential again. If you really want to remove the virtualapp/didlogical credential then follow the steps given below

  1. Hold Windows key and press R
  2. Type control panel and press Enter

  1. Click User Accounts

  1. Click Credential Manager

  1. Select Windows Credentials

  1. Select virtualapp/didlogical

  1. Click Remove and follow any additional on-screen instructions

You should be good to go once the virtualapp/didlogical credential is removed.

The post What is: Virtualapp/Didlogical appeared first on Appuals.com.


Fix: There is no email program associated to perform the requested action error

An Email client is simply a software designed to send, receive, read, and write emails on your computer. A Desktop email client is a bit different from a web-email client. A Desktop email client is an application that needs to be installed on your system. Unlike web-email client, you don’t have to access the browser in order to check or send your email. There are several desktop email clients but the most widely used are Microsoft Outlook and Firefox Thunderbird. Every one of these email clients comes with their own set of features that lets you organize and sync your email across multiple platform in addition to reading/writing and sending/receiving emails.

Using the Send To option from the context menu and selecting Mail receipt is a very handy way of sending documents right from the File Explorer. It is a very easy and efficient way of emailing your files. But, in some cases, you might see an error message when trying to share documents via the Send To option. The error message is this

There are a couple of things that can cause this issue. The pre requirement for using this feature in windows is to have a desktop mail client with simple-MAPI or MAPI support like Microsoft Outlook or Firefox Thunderbird. The Windows own Mail app comes pre-installed in the Windows as well but that is known to cause some issues with the Send To options as well. So, even though you shouldn’t need a third party mail client, you might have to download one. There are other, simpler, cases where the problem is caused by having no app set as the default app for the mail. If you are seeing this issue specifically for Microsoft Outlook then the problem might be because of the corrupted Microsoft Outlook keys. It is pretty normal for files to get corrupt. Lastly, Cortana can be the culprit of this issue as well. There are some Cortana settings that, if enabled, can cause this issue.

Tip

Sometimes, the issue is resolved simply by doing what the error is telling you to do. The error message explicitly tells you set an email program as default. So, if you don’t have an email program then you can download any email program of your choice and then follow the steps given below to set it to default. Note: You can set the built-in Mail app to default but it is known to cause problems with the Send To option. But you can try with the built-in Mail app as well.

  1. Hold Windows key and press I
  2. Click Apps
  3. Select Default Apps from the left pane
  4. Select the application under the Email section
  5. Select Mail (Or an application of your choice) from the newly appeared list
  6. Reboot

Check if this solves your issue. Move to the methods listed below if your problem is still there.

Method 1: Using the Registry Editor

As we have already discussed, the most likely reason for this issue is corrupted Outlook registry keys. This registry corruption leads to problems whenever an application/program tries to connect to the Outlook Simple MAPI interface.

Since we can’t really fix the corrupted registry keys, we will have to first delete the Outlook registry keys. We can then repair the Outlook which will lead to rebuilding the delete registry keys.

Follow the steps given below to delete the Microsoft Outlook corrupted registry keys

  1. Hold Windows key and press R
  2. Type regedit and press Enter

  1. Now, navigate to this location HKEY_LOCAL_MACHINE\Software\Clients\Mail\Microsoft Outlook. If you don’t know how to navigate to this location then follow the steps given below
    1. Locate and double click HKEY_LOCAL_MACHINE from the left pane
    2. Locate and double click Software from the left pane
    3. Locate and double click Clients from the left pane
    4. Locate and double click Mail from the left pane

  1. Locate and right click Microsoft Outlook from the left pane
  2. Select Delete and confirm any additional prompts

  1. Close the registry editor
  2. Hold Windows key and press I
  3. Click Apps

  1. Select Default Apps from the left pane
  2. Select the application under the Email section

  1. Select Mail from the newly appeared list

  1. Reboot

This should resolve the issue for you.

Method 2: Change Cortana Settings

Changing the Cortana settings has resolved the issue for plenty of people. There is a setting in Cortana that lets Cortana use the Email and Calendar. Unchecking this setting has helped resolve this issue for a considerable amount of users. Follow the steps given below to change access and change these settings

  1. Hold Windows key and press I
  2. Select Cortana

  1. Select Permissions & History
  2. Select Manage the information Cortana can access from this device

  1. Turn off Contact, email, calendar & communications history


This should solve the issue for you.

The post Fix: There is no email program associated to perform the requested action error appeared first on Appuals.com.


How to Move a Window that is OFF Screen

There are some cases where you’ll start an application or open a window and it will be off the screen. In majority of the cases, you might be able to see and interact with half (or a part of the window) but the other half will be off screen. Rarely, you’ll find yourself with an application or window that is completely off the screen. In these situations, it is very hard to move these windows or even interact with them. There are so many cases where we noticed that users weren’t even able to move the window which can be really inconvenient and might make the window/application completely useless.

This problem can happen when you accidentally move a window off the screen. This can also happen when you have a dual screen and left the window open on the other display. So, when you move back to a single screen, your window might open at the same location.

Method 1: Use Task Manager

Note: This method will not work for the latest version of Windows 10. The option to maximize the window via Task Manager is not available in the latest versions of Windows 10.

You can maximize your windows using the Task Manager. Here are the steps for locating the maximize option for your application.

  1. Press and Hold CTRL, SHIFT, and Esc key simultaneously (CTRL + SHIFT + ESC)
  2. This should open the Task Manager
  3. Locate your application from the list. Make sure you are in the Process tab
  4. Click the arrow besides the application name
  5. Right click the application entry from the newly opened list and select Maximize. If you are seeing multiple entries in the newly opened list then try to right click and select maximize for all the entries

This should maximize your window and resolve the issue.

Method 2: Use Windows Key Shortcuts

You can use the Windows key along with the arrow keys to move your application window. Here are the steps for getting your Windows back to the screen

  1. If your windows is minimized then Hold Windows key and press the Up arrow key to maximize the window.
  2. Hold Windows Key and press the left arrow key to change the location of your application window. If it doesn’t appear on the screen then press the left arrow key (while holding down the Windows key again). Pressing the Windows and Left arrow key brings the application window to the left side of screen. This combination of the keys make your window go through a cycle of positions. So, you might have to press the left arrow key multiple times to bring the window to the appropriate location.

Method 3: Use Taskbar

You can open the right-click menu via the Taskbar for the problematic application and select the move option from there. This option will let you move the application window via the arrow keys and even mouse as well. Follow the steps given below to move the application via the taskbar menu

  1. Right click your application icon from the Taskbar and select Move
  2. If you are on Windows 10 or you simply can’t see a menu with the Move option the Hold Shift key and then right click the application icon from the Taskbar. Select Move
  3. Press any of the arrow keys Now the application window will be attached to your mouse. Simply move the mouse and your application window should move along with it. Note: You don’t have to click or anything, simply move the mouse around.
  4. You can also just use the arrow keys to move the application windows. In step 2, keep pressing the arrow key and your application window will move in that direction. Since the application window will move to the direction of your arrow key, make sure you press the right arrow key.

This should help you get your application window to the right place.

Method 4: Use Taskbar (alternative)

You can open the Taskbar’s own menu and select the Cascade Window option to bring the application window back to the screen. The main purpose of the Cascade window option is to arrange all open windows to overlap one another with their title bars remaining visible. This option allows you to quickly see which windows are open. Fortunately for us, this will bring the out-of-screen window in the middle as well.

Note: This is a very messy option especially if you have a lot of windows open on your screen. It will bring all the windows in the middle and resize the windows as well. So, if you don’t want to deal with resizing all the windows again then we will suggest other methods listed here.

  1. Right click on the Taskbar (not on an icon, simple on the Taskbar)
  2. Select Cascade window

That’s it.

The post How to Move a Window that is OFF Screen appeared first on Appuals.com.


Fix: Windows 10 Update Error 0x800706be

0x800706be error is a Windows error code that is shown whenever a system file is having an issue. This error can be shown by other windows compatible software and driver vendors as well. This is a general error that points to a misconfigured or corrupt system file. So, you might see this error at different events. You might see this error when clicking the audio icon from the system tray. You might see this error whenever you’re Windows Update or Upgrade fails. So, you might see this error on different occasions. But, this article is focused on explaining and solving the 0x800706be error appearing during Windows Update.

If you are trying to install the latest Windows updates then you might see an error 0x800706be on the screen. This error message will be shown with a Windows Update failed message. Obviously, you won’t be able to update your Windows while seeing this error message. This error code will keep appearing during the Windows Update even after a reboot or multiple attempts at the Windows Update.

The error code 0x800706be is shown whenever there’s a problem with your system files. The system files can be misconfigured or corrupt. The most likely cause of this error is the corruption in Windows Update Components. Corruption in the files can happen to anyone at any time and it is a normal thing. Corrupt Windows Update Components or Corrupt Windows Update files will prevent Windows Update from successfully getting installed.

Tip

Try running the Windows Update Troubleshooter before applying the solutions given in methods below. Running the Windows Update Troubleshooter usually resolves the issue and doesn’t require a lot of technical steps.

  1. Hold Windows key and press R
  2. Type control.exe /name Microsoft.Troubleshooting and press Enter
  3. Click Windows Update and follow any additional on-screen instructions

Method 1: Reset Windows Update Components

Resetting Windows Update Components has worked for plenty of users. Since the issue is most likely caused by corrupted Windows Components, deleting the old files and resetting the components is the logical answer.

Simply follow the steps given below to reset your Windows Update Components

  1. Press Windows key once
  2. Type command prompt in the Windows Start Search
  3. Right click Command Prompt from the search results and select Run as administrator

  1. Type net stop wuauserv and press Enter
  2. Type net stop cryptSvc and press Enter
  3. Type net stop bits and press Enter
  4. Type net stop msiserver and press Enter
  5. Type ren C:\Windows\SoftwareDistribution SoftwareDistribution.old and press Enter
  6. Type ren C:\Windows\System32\catroot2 Catroot2.old and press Enter

  1. Type net start wuauserv and press Enter
  2. Type net start cryptSvc and press Enter
  3. Type net start bits and press Enter
  4. Type net start msiserver and press Enter

Now close the Command prompt and try to update the Windows again.

The post Fix: Windows 10 Update Error 0x800706be appeared first on Appuals.com.


Fix: Microsoft Virtual WiFi Miniport Adapter Missing

Some users have been reporting that their Wi-Fi connections are not functioning because Microsoft Virtual Wifi Miniport Adapter is missing. Most users encounter this issue after trying to create a hotspot on their Windows computers. This error typically occurs because the WiFi Miniport Adapter is either removed by mistake or disabled by a 3rd party software.

The WiFi Miniport is essentially a virtual device that only exists after the user has successfully succeeded in setting up a hosted network. When the WiFi Miniport adapter is missing, it will stop being visible inside Device Manager or the Adapter Settings list.

If you’re currently struggling to get the Microsoft Virtual WiFi Miniport Adapter back, this article will help you troubleshoot the issue away. Below you have a collection of methods that other users have used to resolve the issue.  Please follow the methods below in order until you find a fix that allows you to retrieve the Microsoft Virtual WiFi Miniport Adapter. Let’s begin!

Method 1: Enabling Multimedia/Gaming Environment and Adhoc support 802.11n

Some users have managed to resolve the issue by modifying some WiFi adapter settings. By enabling Multimedia/Gaming Environment and Adhoc support 802.11n, some users have managed to stop the Microsoft Virtual Wifi Winiport Adapter Missing error from occurring.

Here’s a quick guide on how to enable Multimedia/Gaming Environment and Adhoc support 802.11n from Device Manager:

  1. Press Windows key + R to open up a Run command. Next, type “devmgmt.msc” and hit Enter to open Device Manager.
  2. In Device Manager, expand the Network adapters drop-down menu, right-click on your Wi-Fi network adapter driver and choose Properties.
  3. In the Properties menu, expand the Advanced menu.
  4. Use the menu under Properties to select AdHoc 11n and set the value to Enable. Then, repeat the same procedure with Adhoc support 802.11n and Multimedia/Gaming Environment.
  5. Reboot your computer and see if the issue has been resolved at the next startup.

If the Microsoft Virtual WiFi Miniport Adapter is still missing, move down to Method 2.

Method 2: Enabling the WLAN service

Although the WLAN service should be enabled by default, there are certain 3rd party applications (particularly PC optimizers) that will disable this service in an attempt to free up resources.

You can test this theory by visiting the Services screen. If the WLAN service is disabled, you can modify the startup behavior and modify the service to Automatic in order to make sure that you always have it enabled.

Here’s a quick guide on how to do this:

  1. Press Windows key + R to open up a Run box. Then, type “services.msc” and hit Enter to open the Services screen.
  2. In the Services screen, scroll down through the list of services and double-click on the service called WLAN.
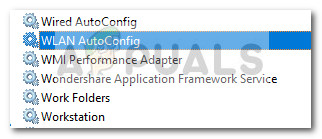
    Note: If you’re on Windows 10, the service will be named WLAN AutoConfig.
  3. In the Properties of WLAN (or WLAN AutoConfig) window, go to the General tab and set the Startup type to Automatic.
  4. Close the Services window and reboot your computer. At the next startup, check Device Manager to see if Microsoft Virtual Wifi Miniport Adapter has reappeared.

If Microsoft Virtual Wifi Miniport Adapter is still missing, move down to Method 3.

Method 3: Using Command Prompt to enable WLAN

If the two methods above have been ineffective, let’s see whether force starting the WLAN service via an elevated Command Prompt will force the Microsoft Virtual Wifi Miniport adapter to re-appear.

Some users have managed to resolve the issue after using a simple command inside Command Prompt. Here’s a quick guide on how to do this:

  1. Press Windows key + R to open up a Run box. Then, type “cmd” and press Ctrl + Shift + Enter. Next, click Yes at the UAC (User Account Control) prompt to open Command Prompt with administrative privileges.
  2. Enter the following command in the elevated Command Prompt and hit Enter to start the WLAN service:
    netsh wlan set hostednetwork mode=allow
    
  3. See if the Microsoft Virtual Wifi Miniport adapter har reappeared among the Network devices.

If the Microsoft Virtual Wifi Miniport adapter is still missing, move down to Method 4.

Method 4: Using a previous system restore point

If all of the above have proven to be ineffective, you might be able to get your Microsoft Virtual Wifi Miniport adapter by using System Restore to revert your PC to a previous state.

The System Restore feature allows Windows users to revert their machine to a previous state. We can use System Restore to revert your computer to a state where the Microsoft Virtual Wifi Miniport adapter was not missing. Here’s a quick guide on how to do this:

  1. Press Windows key + R to open up a Run box. Next, type “rstrui” and hit Enter to open the System Restore wizard.
  2. In the first System Restore window, hit Next at the first prompt then check the box near Show more restore points.
  3. If available, pick a restore point dated before the Microsoft Virtual Wifi Miniport adapter has disappeared from the Network devices list and hit the Next button again.
  4. Finally, click on Finish to start the restoring process. Your computer will restart and the old state will be mounted at the next startup. See whether the Microsoft Virtual Wifi Miniport adapter has re-appeared. If it’s still missing, move down to the final method below.

Method 5: Doing a Windows Reinstall or Repair Install

If none of the methods above have allowed you to get the Microsoft Virtual Wifi Miniport adapter back, a reinstall is practically your only option left. If you have Windows 10, you can make the process a whole less painful by opting for a repair install.

A repair install reinstalls all windows components while allowing the user to preserve their personal files and applications. If you’re interested in doing a repair install, follow our complete guide (here).

If you don’t have Windows 10, a sure way to fix the default behavior of Microsoft Virtual Wifi Miniport Adapter is to do a clean Windows install.

The post Fix: Microsoft Virtual WiFi Miniport Adapter Missing appeared first on Appuals.com.


Fix: Steam Library Folder not Writable

The default location for new Steam games is located at the same folder where you decided to install Steam in and that is usually in Program Files >> Steam >> SteamApps >> Common. However, certain problems begin to appear if you try and create a new library for Steam games, especially if that library is located on an external SSD or HDD drive.

This problem does not appear exclusively in this scenario and there are many different causes for it. Still, you can follow some of the methods below to try and solve the problem quite easily!

Solution 1: Make Sure the Folder is not Read-Only

If the problem occurs during an installation or the updating process of a Steam game, you might as well try and navigate to your library folder and check to see if the folder has the read-only properly turned on. If it does, try turning it off and check to see if that actually solves the problem.

  1. First of all, let’s clear the downloading process in order to restart it. Close your Steam client completely by right-clicking its icon at the system tray and choosing the Exit option.
  2. Navigate to the C >> Program Files >> Steam >> SteamApps >> downloading folder and delete the numbered folder corresponding to the problematic game. You can find that number here by searching for your game and checking the AppID number next to it.

  1. If the folder can’t be deleted, you may need to take ownership of it. Right-click the folder, click Properties, and then click the Security tab. Click the Advanced button. The “Advanced Security Settings” window will appear. Here you need to change the Owner of the key.
  2. Click the Change link next to the “Owner:” label The Select User or Group window will appear.

  1. Select the user account via the Advanced button or just type your user account in the area which says ‘Enter the object name to select’ and click OK. Add your user account.
  2. Optionally, to change the owner of all subfolders and files inside the folder, select the check box “Replace owner on subcontainers and objects” in the “Advanced Security Settings” window. Click OK to change the ownership. Try deleting it afterwards.

After this, we will try to remove the read-only property from the library folder you are using at that helped most users solve their problem immediately.

  1. Locate the library folder where your games should install and download. The usual location is C >> Program Files >> Steam >> SteamApps. However, the error usually appears with user-added folders so make sure you navigate to it.

  1. Right-click on the problematic folder and click the Properties option from the context menu. Stay in the General tab and locate the Attributes section at the bottom. Clear the box next to the Read-only option and click on Apply before exiting. Check to see if the problem still appears.

Solution 2: Reinstall the Problematic Game

If the problem appears during an update for an existing game on your computer and if the problem didn’t appear before for the same game and for the same folder, it might just be a bug which can be fixed by reinstalling the game.

It’s an easy, but time-consuming process because of the fact that you will have to redownload the game files. The good thing is that you won’t lose any of your progress as it’s linked to your Steam account.

  1. First of all, make sure you are logged in with an administrator account as you won’t be able to delete programs using any other account.
  2. Make sure your files are backed up using Steam Cloud in order to make sure you don’t lose your in-game progress.
  1. Click on the Start menu and open Control Panel by searching for it. Alternatively, you can click on the gear icon in order to open settings if you are using Windows 10.
  2. In Control Panel, select to View as: Category at the top right corner and click on Uninstall a Program under the Programs section.

  1. If you are using the Settings app on Windows 10, clicking on Apps should immediately open a list of all installed programs on your PC.
  2. Locate the problematic game in Control Panel or Settings and click on Uninstall.
  3. Steam client should launch after a while and ask you to confirm your choice and delete the game files from your computer. Make sure you confirm your choice and stay patient for the process to finish.
  4. Reinstall the game by navigating to the Library area of your Steam client and locating your game from the list at the left side of the window. Right-click on the game and choose the Install game option. It should start the downloading and installing process immediately. Check to see if you still receive the same error.

Solution 3: Perform a Folder Fix from the Client

The Steam client actually has a method to fix the current library folder easily and this feature has proven itself useful even when dealing with these errors. There are plenty of users who claim that this simple method has managed to solve their problem after the solutions above have failed so make sure you try it out!

  1. Open your Steam client by double-clicking its icon on the Desktop or by searching for it in the Start menu and clicking on the first result.
  2. Click on the Steam option at the menu at the top of the client’s window and choose Settings. In the Settings window navigate to the Downloads tab and click on the Steam library folders button at the top of the window.

  1. Locate the folder where your problematic game is located. You should be able to see the default library folder (C >> Program Files >> Steam) as well as all folders you have added manually. Choose the one you want to fix, right-click on it and choose the Repair Library Folder option.
  2. Confirm any UAC prompts and you should see a Steam Client Service window open with a “Command-Prompt-like” interface. Wait for a while in order to repair the folder- It should close on its own so check to see if your problem is solved afterwards.

Solution 4: Use a Folder Other Than Program Files

If the Program Files folder on your computer has become write-protected in a way, you might want to change the default library folder on your computer and set it to a new one, hopefully solving the problem you are facing. Good luck!

  1. Create a folder anywhere you want. That folder is where the problematic game will be downloaded so make sure there is plenty of space at that specific location. Make sure you disable its read-only property just like in Solution 2, the second part.
  2. Right-click on your Steam client either on the Desktop or in Start menu and choose Run as administrator.

  1. After that, click on the Steam option at the menu at the top of the client’s window and choose Settings. In the Settings window navigate to the Downloads tab and click on the Steam library folders button at the top of the window.
  2. Click on Add Library Folder and select the folder you have created in the step 1 of this solution. Now, every time you try and download and install a game, you will be prompted by a choice of where to install.
  3. Uninstall the game by navigating to the Library tab in the Steam client, locating your game in the list at the left side of the window, right-clicking on it, and choosing the Uninstall option.

  1. Try to install it again from Library and make sure you select the new folder for the installation. Right-click on the game in the Library and choose Install. Check to see if the problem is gone.

Solution 5: Restart Your Computer                                                 

This may look like the simplistic solution which never actually works but there are plenty of users who simply didn’t think restarting the computer will solve it but it did, eventually. Make sure you restart your computer often enough as there are bugs which appear when the system has been running for too long and restarting it sort of fixes this issue.

Click on the Start menu and click the power button. Choose Restart and wait for your computer to boot again. Check to see if the problem is gone now.

Solution 6: Check Your Drive for Errors

If the problem is not directly linked to Steam issues, it may be your hard drive corruption which is causing the issue or there might have been some bugs which can be solved easily. Either way, there is a simple way you can run a scan for errors on your hard drive (or any other storage device where your games might be located). This has helped several users and it’s very easy to do it!

  1. Open This PC or My Computer depending on the version of Windows you have installed. You can get there by opening your Windows Explorer interface and clicking on This PC/My Computer at the left side navigation pane.
  2. Right-click on the drive where your problematic game is located and choose the Properties option. In the Properties window, navigate to the Tools tab and click on Check under the Error checking section.

  1. Follow the instructions on screen in order to progress and be patient for the tool to scan your hard drive as it will definitely take a while. Restart your computer afterwards and check to see if the problem is gone.

Solution 7: Make Sure You Add Steam to Antivirus’ Exceptions

Antivirus tools should not disturb the operations of normal, trustworthy programs such as Steam but they sometimes do that and that is a fact that has been going on for years now. This often occurs with free antivirus tools such as Avast or AVG but the problem can be resolved simply by adding Steam to the exceptions list, without needing to uninstall or change the antivirus you are using.

  1. Open the antivirus user interface by double-clicking on its icon at the system tray (right part of the taskbar at the bottom of the window) or by searching for it in the Start menu.
  2. The Exceptions or Exclusions setting is located in different spots with respect to different antivirus tools. It can often be found simply without much hassle but here are some quick guides on how to find it in the most popular antivirus tools:

Kaspersky Internet Security: Home >> Settings >> Additional >> Threats and Exclusions >> Exclusions >> Specify Trusted Applications >> Add.

AVG: Home >> Settings >> Components >> Web Shield >> Exceptions.

Avast: Home >> Settings >> General >> Exclusions.

  1. You will need to add Steam’s main executable file in the box which will appear prompting you to navigate to the file. It should be in the same directory where you installed it (C >> Program Files >> Steam >> Steam.exe is the usually location). If you have a shortcut on the desktop, right-click on it and choose Open file location.
  2. Check to see if you are now able to open the file. If it still won’t work, try restarting your computer and try again.

Solution 8: Take Ownership of the Folder and Give Write Permissions

If the error says that the folder is not writeable, it’ quite possible that you don’t have the sufficient permissions to write and read from that folder. This can occur because of a variety of different reasons and it’s quite straightforward to fix it if you have the patience.

  1. Right-click the library folder you are using, click Properties, and then click the Security tab. Click the Advanced button. The “Advanced Security Settings” window will appear. Here you need to change the Owner of the key.
  2. Click the Change link next to the “Owner:” label The Select User or Group window will appear.

  1. Select the user account via the Advanced button Add your user account.
  2. Optionally, to change the owner of all subfolders and files inside the folder, select the check box “Replace owner on subcontainers and objects” in the “Advanced Security Settings” window. Click OK to change the ownership.
  3. In the Security tab of the library folder’s Properties window, click on Edit in order to change permissions and select your personal user account you set the ownership to. Change permissions to Full Control and apply the changes. Check to see if the problem occurs anymore.

The post Fix: Steam Library Folder not Writable appeared first on Appuals.com.