Fix: High DPC Latency on Windows 10
Deferred Procedure Call (DPC) is a Microsoft Windows OS mechanism which allows high-priority tasks to defer required but lower-priority tasks for later execution. This permits device drivers and other low-level event consumers to perform the high-priority sections of their processing quickly, and schedule non-critical additional processing for execution at a lower priority.
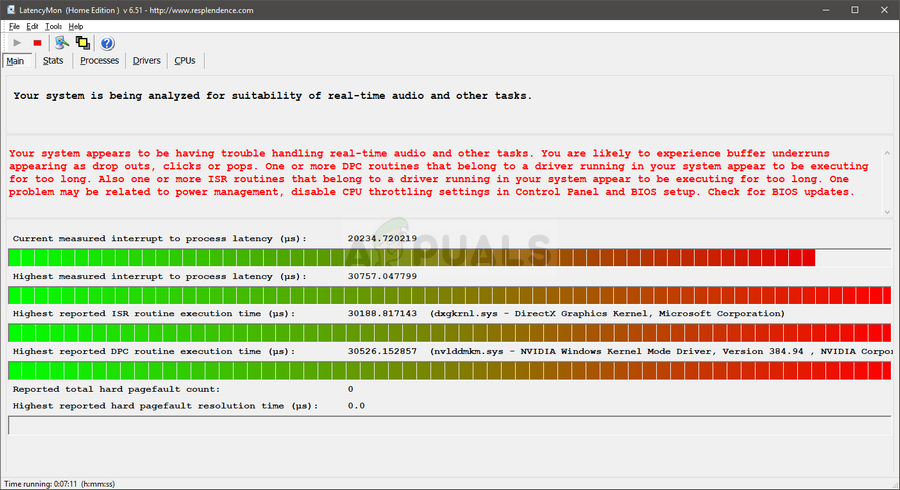
High DPC latency can usually be observed in device drivers which sometimes go wrong and display a high value of the DPC latency. There are several solutions to this problem and we will present some of them below. Good luck!
Solution 1: Change the Current Power Plan
Almost all of the power options you are changing reflect upon the Balanced power setting and, even if one of these settings is not so good, it will always reflect upon your computer’s performance. There are several users who claim that switching to either High performance or Power saver helped them solve their problem.
- Right-click on the battery icon located in the system tray and click on Power Options. If you are not using Windows 10, click on the Start menu and search for Control Panel. Change the View by option to Large icons and click on the Power Options button.
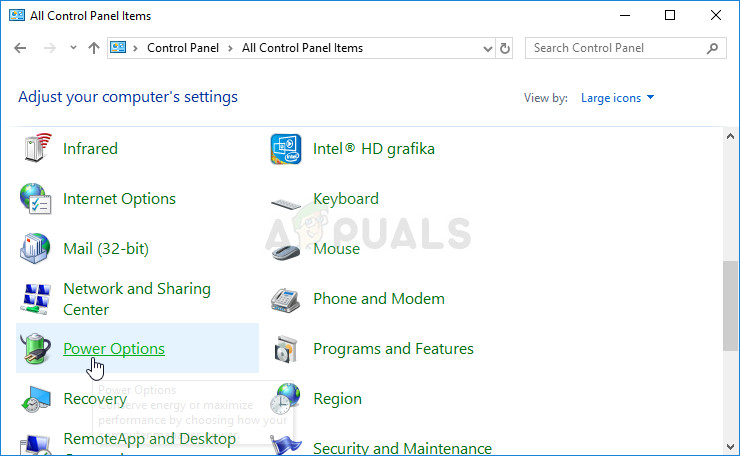
- Choose any power plan except the Balanced one by clicking on the small circle next to the entry. You can also click on Show additional plans in order to see all plans available for you to choose from. Check to see if the problem is solved.
Solution 2: Disable Dynamic Ticking and Update the Graphic Card’s Driver
This set of steps is used mostly to optimize and reduced “normally”-induced DPC latency by disabling Dynamic Ticking and updating the graphics cards which always have something to do with lag and latency. This is step is highly helpful and the first part can be easily reverted if you notice some problems:
- Search for “Command Prompt” in the Start menu or the search bar next to it, right-click on it, and select the “Run as administrator” option. You can also use the Windows Key + R key combination in order to bring up the Run dialog box. Type in “cmd” in the box and click OK
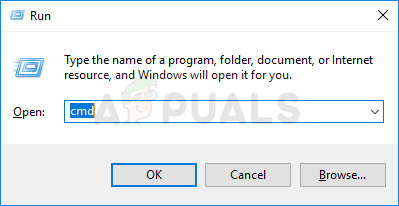
- Copy and paste the following command and make sure you click Enter afterwards.
bcdedit /set disabledynamictick yes
- You should see the “Operation completed successfully message”. Exit Command Prompt and check to see if the problem is solved. If it’s not, proceed with the remainder of the solution.
Now it’s time to update your graphics card driver in order to try and reduce the DPC latency of your computer.
- Select the Start button, type in Device Manager, and select it from the list of results at the top. You can also use the Windows Key + R key combination in order to bring up the Run dialog box. Type in “devmgmt.msc” in the box and click OK.
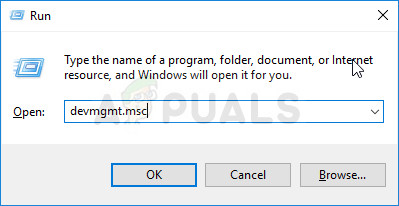
- Expand one of the categories to find the name of the device you want to update, then right-click on it, and select Update Driver. For graphics cards, expand the Display adapters category, right click your graphics card and select Update Driver.
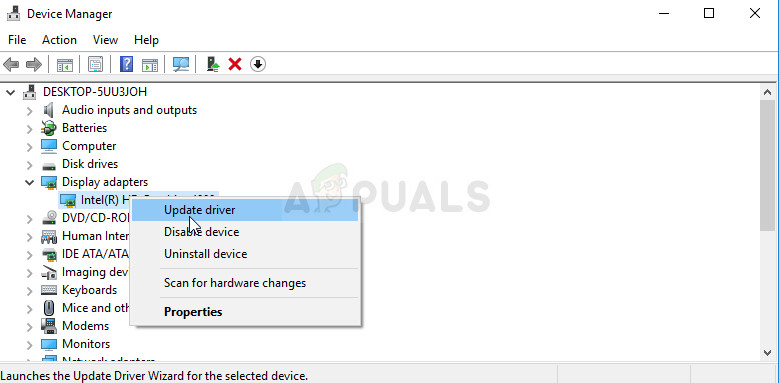
- Select Search automatically for updated driver software.
- If Windows doesn’t find a new driver, you can try looking for it on the device manufacturer’s website and follow their instructions. You will need to repeat the same process for all graphics cards (integrated and external) or you can use an automated tool to do this for you.
Solution 3: Tampering with Network Devices (Wireless and Ethernet)
This method is quite useful and it involves changing certain settings in Device Manager for the network device of your computer. Generall,y these devices are the most common causes for the high DPC latency on Windows PCs and it’s always a good idea to try and change these settings to lower the latency.
- Select the Start button, type in Device Manager, and select it from the list of results at the top. You can also use the Windows Key + R key combination in order to bring up the Run dialog box. Type in “devmgmt.msc” in the box and click OK.

- Expand the Network Adapters category by clicking the arrow next to it and locate the Wireless and Ethernet adapters. They should be at the top of the list and carry a brand’s name such as Intel.
- Right-click on each one and choose Properties from the context menu. Navigate to the Advanced tab and you should be able to see a list branded Property. Locate the Energy Efficient Ethernet option and disable it by clicking the option under Value and choosing Off.
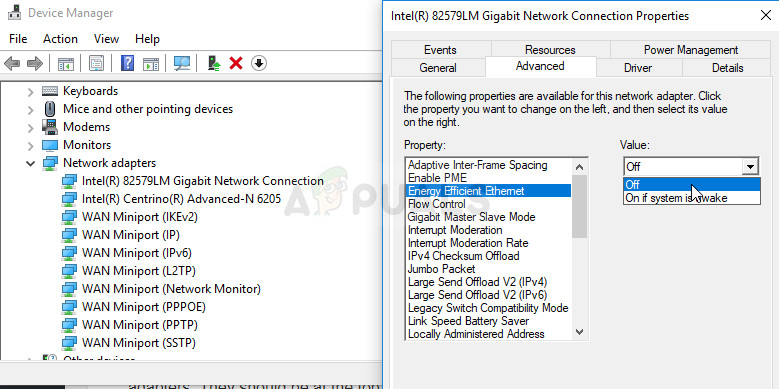
- After that, make sure you navigate to the Power Management tab and uncheck the box next to the Allow the computer to turn off this device to save power. Make sure you repeat the process for all suitable devices and that you apply the changes. Check to see if latency is back to normal.
Solution 4: Uninstall the Firewall on Your Computer
It appears that firewalls which are often installed alongside free antivirus tools usually cause high DPC latency issues and you should consider uninstalling them to solve the problem as they are currently causing more harm than good. The firewall which reportedly causes this issue the most often is Avast’s firewall which can be uninstalled on its own.
- Open your Avast user interface by locating its icon in the system tray, right-click on it, and choose the Open option.
- Locate the Settings window and navigate to the Components tab in the navigation menu at the left side of the window.
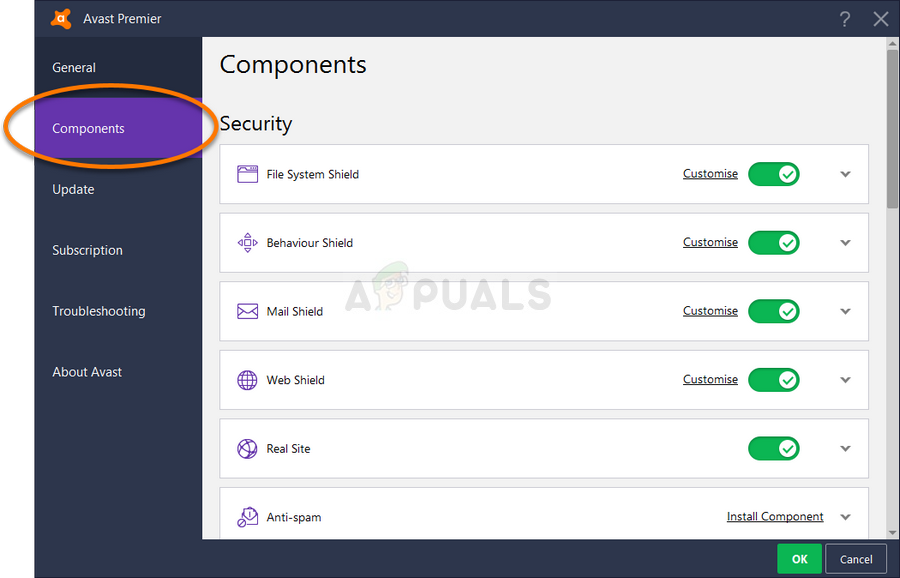
- Locate the Avast Firewall entry on the list and click on the downward facing arrow next to. Click the Uninstall button and confirm the dialog box which will appear promptly. Restart your computer and check to see if latency has gone back to normal.
Furthermore, the Windows Defender Firewall is also the the common cause of such issues and you will have to disable it in order to solve the problem properly and to prevent it from occurring again. Even after disabling it, you might need to disable the service from starting as the service is also often causing trouble.
- Open Control Panel by searching for it after pressing the Start button located at the bottom left part of your desktop.
- Change the View by option to Small icons and locate the Windows Firewall option.
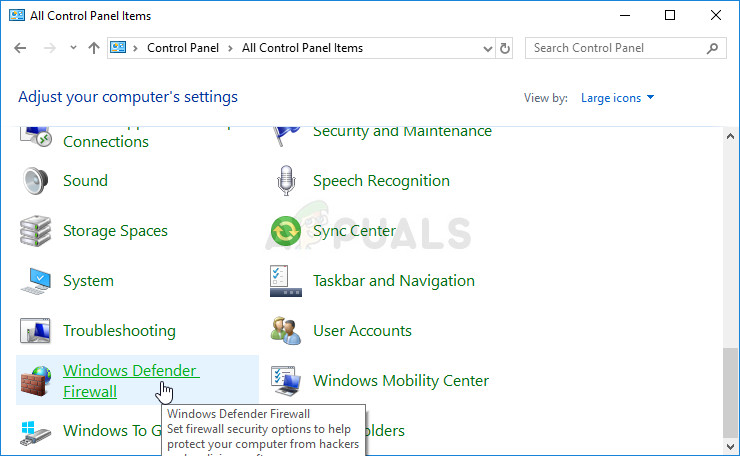
- Click on it and select the Turn Windows Firewall on or off option located at the menu on the left side of the window.
- Click the radio button next to the “Turn off Windows Firewall (not recommended)” option next to both the Private and Public network settings.
The Windows Firewall is now turned off but the service belonging to it has reportedly also caused DPC latency-related issues and you should make sure to disable this service as well. It’s running in the background and throttling your connection no matter whether firewall is turned off or on. Follow the steps below to disable it completely.
- Open the Registry Editor interface by typing “regedit” in either the search bar or the Run dialog box. Navigate to the following key in Registry Editor by navigating in the left pane:
HKEY_LOCAL_MACHINE\SYSTEM\CurrentControlSet\Services\MpsSvc
- At the right side of the screen, you should see a list of registry entries. Scroll down until you see the Start entry as a REG_DWORD so right-click on it and choose Modify.
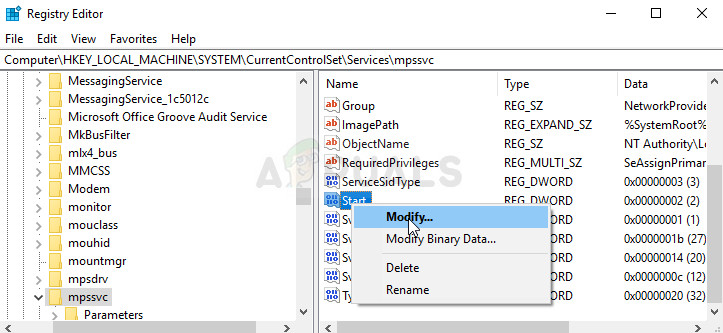
- Change the value under Value data from any number (2 is the default settings) to 4 and click ok OK. Check to see if the problem is solved now.
Solution 5: A Method for AVG Users
It appears that antivirus issues are one of the main causes for these problems, especially if you are using free versions of AVG, Avast, etc. This method is aimed at AVG users who have the free version of AVG installed and who experience high DPC latency. Luckily, you won’t need to uninstall it or disable any shields, just change some setting.
- Use the Windows Key + R key combination in order to open the Run dialog box and type in “ncpa.cpl”, before clicking OK. It can also be achieved by opening Control Panel. Change the view to Category and click on Network and Internet. Click on the Network and Sharing center entry on the list. Locate the Change adapter settings option at the left side of the window and click on it.

- Right-click on the connection you are currently using and click on the Properties option. Under the “This connection uses the following items:” section, locate the “AVG network filter driver” entry and uncheck the box next to it in order to disable it. Click on OK afterwards and check to see if the problem is solved.
Solution 6: Uninstall Bonjour on Your Computer
Bonjour is Apple’s implementation of zero-configuration networking, a group of technologies that includes service discovery, address assignment, and hostname resolution. Bonjour locates devices such as printers, other computers, and the services that those devices offer on a local network.
As such, it’s not completely important for your computer and it was probably installed automatically alongside other programs. You can sometimes solve the problem simply by uninstalling Bonjour on your computer.
- First of all, make sure you have logged in with an admin account as you won’t be able to uninstall programs using any other account privileges
- Click on the Start menu and open Control Panel by searching for it. Alternatively, you can click on the gear icon in order to open settings if you are using Windows 10.
- In Control Panel, select to View as: Category at the top right corner and click on Uninstall a Program under the Programs section.
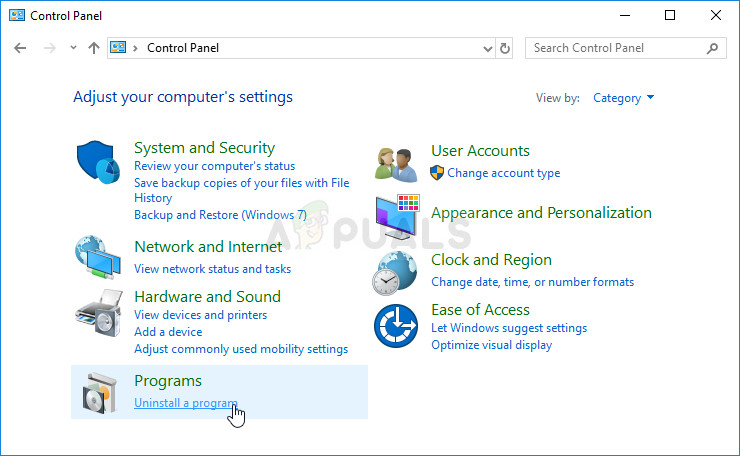
- If you are using the Settings app, clicking on Apps should immediately open a list of all installed programs on your PC.
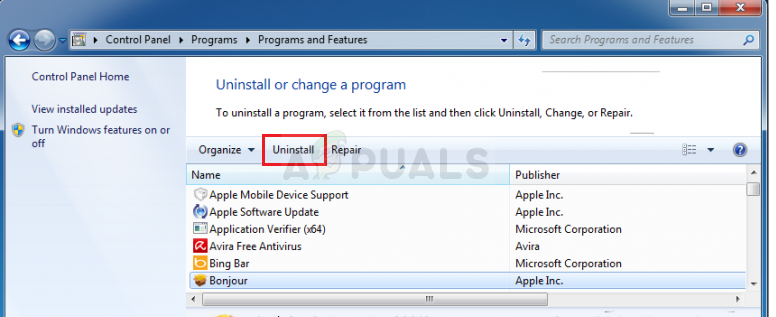
- Locate the Bonjour entry on the list and click on it once. Click on the Uninstall button above the list and confirm any dialog boxes which may appear. Follow the instructions on-screen in order to uninstall Bonjour and restart your computer afterwards. Check to see if you still experience high latency-related issues.
Solution 7: Disable the Internet Protocol Version 6
This protocol seems to be problematic for certain settings on your computer and there are quite a few problems which can be solved simply by disabling it and switching back to the Internet Protocol Version 4. This method was confirmed as successful for Windows 7 but there is nothing saying that it won’t work for newer versions of Windows.
- Use the Windows Key + R key combination in order to open the Run dialog box and type in “ncpa.cpl”, before clicking OK. It can also be achieved by opening Control Panel. Change the view to Category and click on Network and Internet. Click on the Network and Sharing center entry on the list. Locate the Change adapter settings option at the left side of the window and click on it.

- Now that the Internet Connection window is open, double-click on your active Network Adapter.
- Then click Properties and locate the Internet Protocol Version 6 entry on the list. Disable the check box next to this entry and click OK. Restart your computer in order to confirm the changes and check to see if the error appears again.
Solution 8: Use the Following Regedit Tweaks to Disable a Certain Process
There is a service called NVIDA PowerMizer: The ultimate goal of PowerMizer technology is to optimize power use for the longest battery life in a notebook PC while providing the performance necessary for the task at hand.
This is kind of like what Intel has to limit the CPU computing power based on what applications are running. in other words, it’s a power management process for your graphics card which can cause changes in the CPU usage and it can definitely cause issues.
- Since you are going to edit the registry, we recommend you check out this article we have prepared in order to safely backup your registry to prevent further problems. Still, nothing wrong will occur if you follow the instructions carefully.
- Open the Registry Editor interface by typing “regedit” in either the search bar or the Run dialog box. Navigate to the following key in Registry Editor by navigating in the left pane:
HKEY_LOCAL_MACHINE\SYSTEM\CurrentControlSet\Control\Video\********\0000\
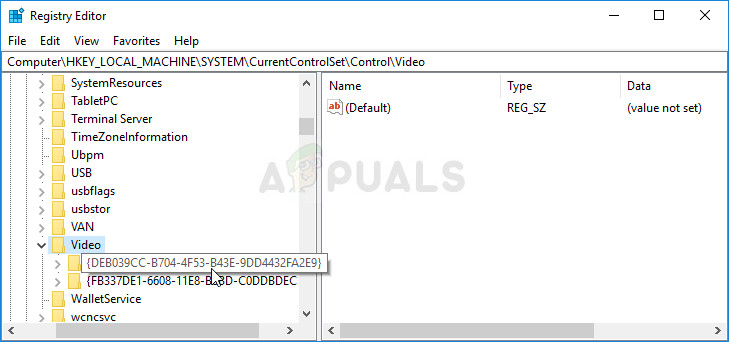
- The *’s will be random numbers and letters. There will be a few of them so pick the “0000” folder with the most keys in it.
- Right-click on the right side of the window and choose New >> DWORD (32bit) value. You will need to do this 4 times and make sure you name the keys as following: PerfLevelSrc, PowerMizerEnable, PowermizerLevel, PowermizerLevelAC
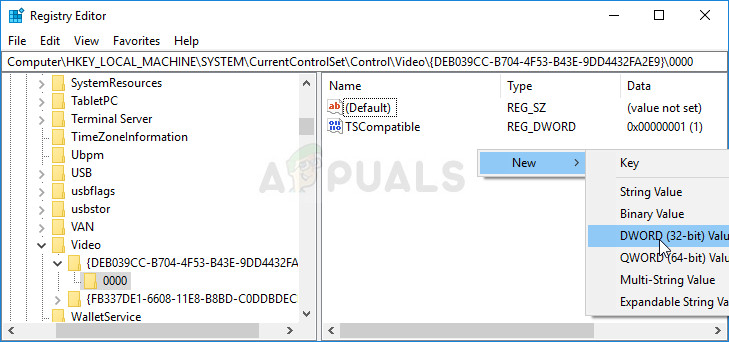
- You will need to change their value by right-clicking on each of them and choosing the Modify option. Set the values according to the info below:
PerfLevelSrc ——– 3322
PowerMizerEnable ——– 0
PowermizerLevel ——– 1
PowermizerLevelAC ——– 1
- Restart your computer and the Powermizer option should be disabled, resulting in your DPC latency of decreasing.
The post Fix: High DPC Latency on Windows 10 appeared first on Appuals.com.


No comments