How to Disable OneDrive Windows 10
OneDrive has taken the cloud world by storm and has established a firm footing in the preferred system for backing up files on the go. It was previously known as SkyDrive and is owned and maintained by Microsoft itself. In the latest version of Windows, OneDrive is pre-embedded in the system and has a folder made in your directory which corresponds to your OneDrive account registered with your Microsoft account email.

Despite how useful this feature might seem, there are cases where you want this application to be uninstalled from your computer. The uninstallation process varies depending on the version of Windows installed on your computer. Take a look at the methods below.
Windows 10 Home
Windows 10 home users can uninstall OneDrive quite easily without getting into their registries or group policies. The program is listed in the applications just as any other application. You can easily uninstall it using the application manager of Windows. However, do note that this will only remove OneDrive from your computer but the folder will still be present. It will not be functional but it will remain there. If you are okay with this, follow the steps below. If you want to remove the folder as well, perform the registry edit.
- Press Windows + R, type “appwiz.cpl” in the dialogue box and press Enter.
- Here all the applications installed on your computer will be listed. Navigate through them, locate OneDrive, right-click it and select Uninstall.

- Restart your computer after the uninstallation process. OneDrive will not be functional now.
If you want to get rid of the folder from your File Explorer too, follow the registry edits mentioned below. The registry edits can also be followed by other versions of Windows but the group policy is the preferred method for them.
Note: The registry editor is a powerful tool. Changing keys and values which you have no idea of can render your PC useless. It is also wise to backup your registry before proceeding.
- Press Windows + R, type “regedit” in the dialogue box and press Enter. Once in the registry editor, navigate to the following address:
HKEY_CLASSES_ROOT\CLSID\{018D5C66-4533-4307-9B53-224DE2ED1FE6}
Double-click on the key “System.IsPinnedToNameSpaceTree” to edit it. Set the value to 0 and press OK to implement changes.

If you are using a 64-bit version of Windows, you will have to navigate to the additional location listed below and change the same key to 0.
HKEY_CLASSES_ROOT\Wow6432Node\CLSID\{018D5C66-4533-4307-9B53-224DE2ED1FE6}

After making the necessary changes, restart your computer properly. The folder will not be visible on your File Explorer anymore and OneDrive will also be uninstalled.
Windows 10 Enterprise, Education, and Professional
The easiest method for disabling OneDrive when you are running one of these versions is using the group policy editor. You will need an admin account to perform the changes and they will ripple through all other user accounts on your computer as well.
- Press Windows + R, type “gpedit.msc” in the dialogue box and press Enter.
- Once in the group policy editor, navigate to the following path:
Computer Configuration > Administrative Templates > Windows Components > OneDrive
- Double-click the entry of Prevent the Usage of OneDrive for file storage and change the setting to Enabled. Press OK to save changes and exit.

This method will completely disable OneDrive on your computer. It will be hidden from File Explorer and no user will be able to launch it. You will not be able to access OneDrive even from the store applications.
Refrain from uninstalling OneDrive from the control panel if you are using this method. It will cause an empty folder from being shown at your File Explorer. If you still see OneDrive even after changing the group policy, you need to reinstall the application from your main Windows system folder. Once done, the module vanishes automatically.
How to see which version of OS I am running?
If you are unable to determine the version of Windows running on your machine, you can follow the steps below.
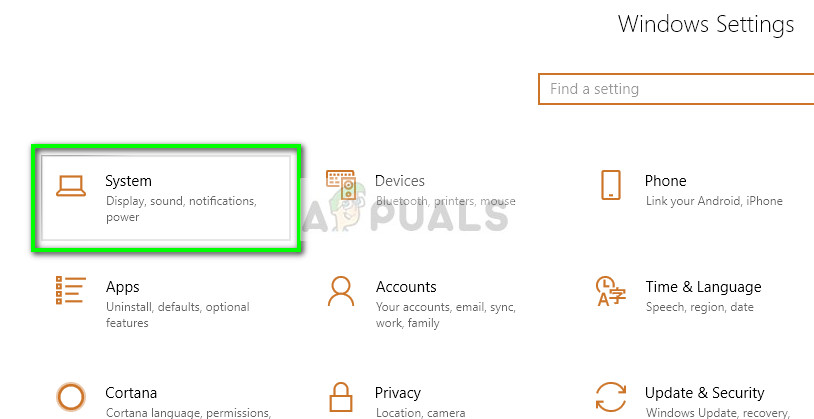
- Press Windows + S, type “settings” in the dialogue box and open the application.
- Once in settings, click on System.

- Click on About from the left navigation pane and see the System type present at the right side of the screen. From there you can determine the type of OS.

Unlinking OneDrive
If you don’t want to completely remove OneDrive from your computer, you can try ‘unlinking’ your account. This will remove all your account information from OneDrive and it will be just like when it is ready for first use.
- Right-click on the OneDrive icon present at the taskbar at the bottom right side of the screen and select Settings.

- Once in the Settings, click on the “Unlink this PC” button present under the tab of “Account”.

- Windows will confirm your actions before it can execute the instruction. Click on “Unlink account” when the prompt comes forth.

- After a few seconds, Windows will pop another window asking you enter your email address. Enter the required information and wait till the removal process is complete. After a while, you will be completely logged out of OneDrive from your computer and any other user can enter his information to use it.
The post How to Disable OneDrive Windows 10 appeared first on Appuals.com.


No comments