

Fix: A debugger has been found running in your system
This error will appear when trying to run a video game or a program installed on your computer and it won’t let you open it due to currently unknown causes. The reason for this error’s existence is that the tool which won’t start analyzes your memory for debuggers in order to protect their source code from being accesses.

This being said, the error is not related to anything dangerous and it can be fixed by following some of the solutions presented below. Good luck!
Solution 1: Add the Game or the Program to Your Antivirus’ Exceptions List
This is one of the top solutions which helped plenty of users deal with this nasty error, especially the ones who got this error while trying to run or install a new game. This means that the antivirus is mostly responsible for this occurrence and you should disable it according to the one you have installed on your PC. Here are some of the most popular ones:
- Open the antivirus user interface by double-clicking on its icon at the system tray (right part of the taskbar at the bottom of the window) or by searching for it in the Start menu.
- The Exception setting is located in different spots with respect to different antivirus tools. It can often be found simply without much hassle but here are some quick guides on how to find it in the most popular antivirus tools:
Kaspersky Internet Security: Home >> Settings >> Additional >> Threats and Exclusions >> Exclusions >> Specify Trusted Applications >> Add.
AVG: Home >> Settings >> Components >> Web Shield >> Exceptions.
Avast: Home >> Settings >> General >> Exclusions.

- You will need to add the game’s or program’s main executable file in the box which will appear prompting you to navigate to the file. It should be in the same directory where you installed it. If you have a shortcut on the desktop, right-click on it and choose Open file location.
- Check to see if you are now able to open the file. If it still won’t work, try restarting your computer and try again.
Solution 2: Update Windows Completely
If the error is caused by a bug in your Windows’ installation, it’s only a matter of time before professionals in Microsoft notice the problem and release a patch to fix it in no time. Most probably the patch has already been released and you may have not been there to download it in time.
It may have something to do with how updates are installed on your computer. Either way, follow the instructions below in order to install all updates immediately.
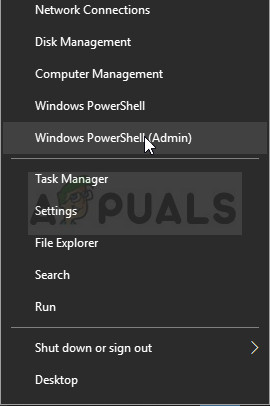
- Open the PowerShell utility by right-clicking the Start menu button and clicking on the Windows PowerShell (Admin) option at the context menu.
- If you see Command Prompt instead of PowerShell at that spot, you can also search for it in the Start menu or the search bar next to it. This time, make sure you right-click on the first result and choose Run as administrator.
- In the Powershell console, type in “cmd” and stay patient for Powershell to switch to the cmd-like window which might appear more natural to Command Prompt users.
- In the “cmd”-like console, type in the command shown below and make sure you click Enter afterwards:
wuauclt.exe /updatenow
- Let this command do its thing for at least an hour and check back to see if any updates were found and installed without issues. This method can be applied to all Windows operating systems, including Windows 10.
Alternative for Windows 10 Users:
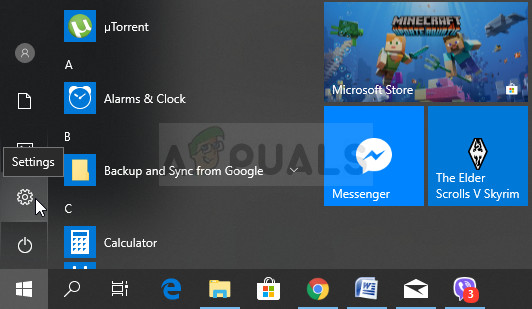
- Search for Settings in the Start menu and click on the first result which pops up. You can also tap on the gear-like button at the lower left part of the Start menu.
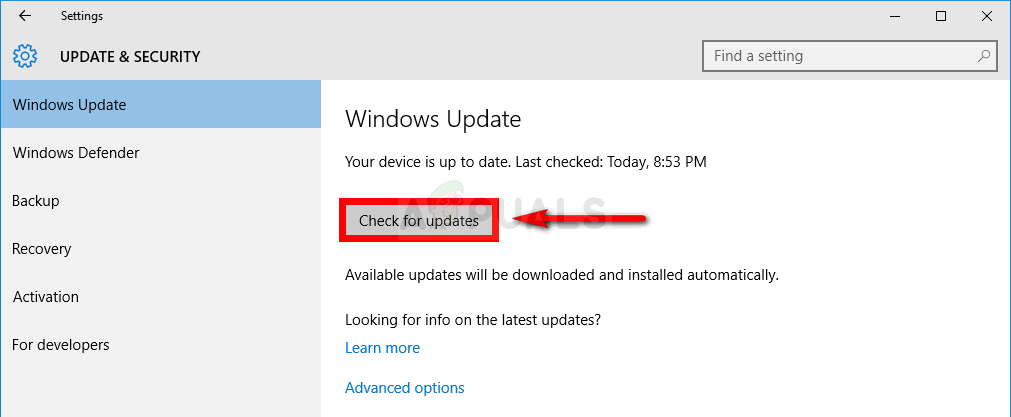
- Locate the Update & security section at the bottom section of the Settings window and click on it in order to open Windows Update options, among others.
- Stay in the Windows Update tab and click on the Check for updates button under the Update status section in order to check if there is a new version of Windows available for users to download.
- If there is one, Windows should start the downloading and installation process automatically. Make sure you remain patient and you restart your computer when prompted. Check to see if the problem with opening the problematic app is solved after this.
Solution 3: Restart Your Computer
Restarting your computer seems too obvious and you may have probably done so at least a couple of times. Even the first two solutions mention restarting your computer at least once. However, there is a weird statement by a few users who had the same error that restarting your computer several times while the error is active managed to solve the issue.
It may sound like a workaround but the fact is that the error disappears and does not return afterwards, which is a great success.
- Click on the Start menu button at the bottom left part of your screen and click on the power button located near the Start menu button.

- You should see three options. Choose restart and wait for your computer to restart completely. Try running the game or the tool again. If the same error appears, restart your computer again. Do so several times.
Solution 4: Perform a System Restore
There are a few unlucky users who failed to fix the problem using the somewhat easy methods presented so far in the article. However, even they managed to solve the problem simply by performing a system restore to a state before the error started to occur.
We thoroughly recommend you check out the solutions above before you try this one as they are much easier and they won’t change anything about your PC.
- First of all, we will turn on the System Restore tool on your PC. Search for System Restore using the Search button in your Windows 10 or the Start menu. From there, click on Create a restore point.

- A System Properties window will appear and it will display the required settings. Inside this window, open the Protection Settings section and make it sure that protection is enabled on your Local Disk C (System Drive).
- If it is disabled, select that disk and click on Configure button to enable protection. You should also allocate a sufficient amount of disk space for system protection. You can set it to any value you want as long as that value is at least of couple of gigabytes. Click on Apply and OK afterwards to apply the settings.

- Now, the system will create a restore point automatically whenever a new program is installed or an important change has occurred on your computer.
After you have enabled it successfully, let’s revert your PC back to the state where the debugger error didn’t occur. Make sure you take note of some important documents and apps you have created or installed in the meantime just to be safe.
- Search for System Restore using the Search button next to the Start menu and click on Create a restore point. Inside the System Properties window, click on System Restore.

- Inside the System Restore window, select the option called Choose a different restore point and click the Next button.
- Select a particular restore point you saved before manually. You can also select any restore point available in the list and hit the Next button to initialize the restoration process. After the process is done, you will be reverted to the state your computer was in at that period in time. Try not going to far or to near. Check to see if the problem is solved!
Solution 5: Troubleshoot in Safe Mode
The error should be solved by starting your computer in Safe Mode and by disabling everything not vital to your computer’s performance. This way, when you start your computer once in Safe Mode and the error stops disappearing, you can narrow down your search for the problematic tool which is causing this error.
- Use the Windows + R key combination on your keyboard in order to open the Run dialog box and type in “msconfig” before clicking OK. Click the Boot tab and check the Safe Boot option.

- Under the General tab, click to select the option Selective startup, and then click to clear the option Load startup items check box.
- On the Startup tab, click ‘Open Task Manager’. In the Task Manager window under the Startup tab, right click on each startup item which are enabled and select ‘Disable’.

- Click OK, and then click Restart. Check to see if the problem still appears. If the problem has ceased to appear, try enabling startup items one by one in Task Manager and restarting your computer. Try running the program each time until it displays the same error message. This is the problematic program so try fixing or uninstalling it.
- Either way, don’t forget to undo the changes you have made and to restart your computer in order to continue using your PC normally.
The post Fix: A debugger has been found running in your system appeared first on Appuals.com.
No comments