Fix: The Remote Computer requires network level authentication
Users report an error stated below on domain-connected systems when they try to remotely access computer systems. This happens even when Network Level Authentication (or NLA) is enabled on the computer. There are simple workarounds present to resolve this issue. Either you can disable the option directly using properties or you can make some changes to the registry and try restarting the system.

The remote computer that you are trying to connect to requires network level authentication (NLA), but your windows domain controller cannot be contacted to perform NLA. If you are an administrator on the remote computer, you can disable NLA by using the options on the remote tab of the System Properties dialog box.
Or this can also happen:
The remote computer requires Network Level Authentication, which your computer does not support. For assistance, contact your system administrator or technical support.
Note: Before following these solutions, it is essential that you back up your data and make a copy of your registry beforehand. Make sure there are no ongoing tasks on both the computer before carrying on.
Solution 1: Disabling NLA using Properties
Network Level Authentication is good. It provides extra security and helps you, as a network administrator control who can log into which system by just checking one single box. If you choose this, make sure that your RDP client has been updated and the target is domain authenticated. You should also be able to see a domain controller.
We will go through the Remote Desktop Setting route and keep things simple at the start. If this doesn’t work, we have also covered other solutions after this one.
- Press Windows + R, type “sysdm.cpl” and press Enter. You will be in the systems properties.
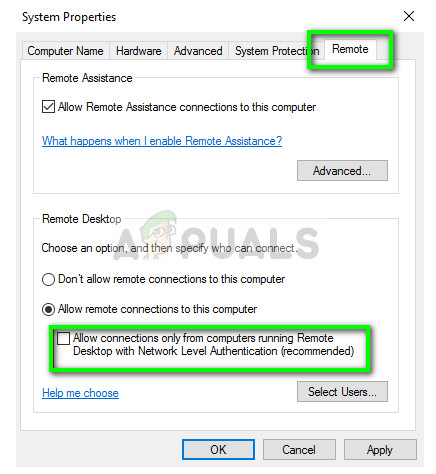
- Click on the remote tab and uncheck “Allow connections only from computers running Remote Desktop with Network Level Authentication (recommended)”.

- Press Apply to save to changes and exit. Now try logging into the remote computer again and check if the problem is solved.
Solution 2: Disabling NLA using Registry
This method also works if you are unable to execute the first one because of some reason. However, do note that this will require you to restart your computer completely and may mean some downtime if you have a production server running. Make sure you save all your work and commit if anything is still left in the staging environment.
- Press Windows + R, type “regedit” in the dialogue box and press Enter to launch the registry editor.
- Once in the registry editor, click on File > Connect Network Registry. Enter the details of the remote computer and try connecting.

- Once you are connected, navigate to the following file path:
HKLM >SYSTEM > CurrentControlSet > Control >Terminal Server > WinStations > RDP-Tcp
- Now change the following values to 0.
SecurityLayer

UserAuthentication
- Now navigate to the PowerShell and execute the command
restart-computer
Solution 3: Disabling using PowerShell
One of my favorite methods to disable NLA without getting into much specifics is disabling it using the PowerShell command remotely. PowerShell allows you to tap into the remote computer and after targeting the machine, we can execute the commands to disable the NLA.
- Launch the PowerShell on your computer by pressing Windows + S, type “powershell” in the dialogue box, right-click on the result and select “Run as administrator”.
- Once in the PowerShell, execute the following command:
$TargetMachine = “Target-Machine-Name”

(Get-WmiObject -class “Win32_TSGeneralSetting” -Namespace root\cimv2\terminalservices -ComputerName $TargetMachine -Filter “TerminalName=’RDP-tcp'”).SetUserAuthenticationRequired(0)
Here the “Target-Machine-Name” is the name of the machine you are targeting.

In the example above, the name of the server is “member-server”.
Solution 4: Using Group Policy Editor
Another way to disable the NLA is using the group policy editor. This is useful if you are blanket disabling. Do note that Group Policy Editor is a powerful tool and changing values which you have no idea of can render your computer useless. Make sure you backup all the values before proceeding.
- Press Windows + R, type “gpedit.msc” in the dialogue box and press Enter.
- Once in the group policy editor, navigate to the following path:
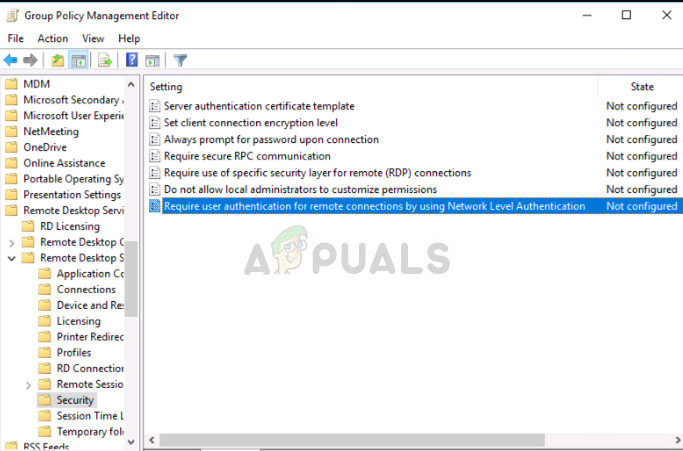
Computer Configuration > Administrative Templates > Windows Components > Remote Desktop Services > Remote Desktop Session Host > Security

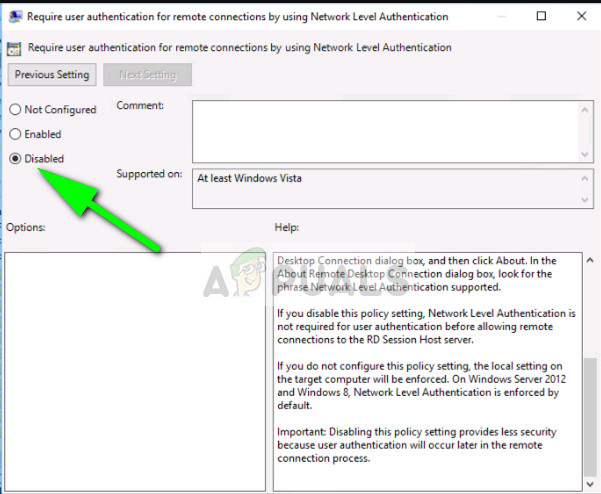
- Now search for ‘Require user authentication for remote connections by using Network Level Authentication’ and set it to disabled.

- After this step, check if the error has been resolved.
Note: If even after all these steps you are unable to connect, you can try removing the machine from your domain and then reading it. This will reinitialize all the configurations and get it right for you.
The post Fix: The Remote Computer requires network level authentication appeared first on Appuals.com.


No comments