Fix: This Computer is Configured to Require a Password in Order to Start Up
From what we’ve seen so far, this appears to be closely related to a virus that enables SAM (registry file) encryption. Because of that, using standard password changing tools such as NT PWD Reset won’t solve this problem. This error can be very difficult to get rid of and it will require some advanced troubleshooting no matter what.

However, we have prepared an article related to this error and hopefully, you will be able to start your computer in no time if you follow the instructions carefully.
Solution 1: Recover Your Registry Backup from Your Computer and Boot Using this Copy
Since what this error does is that it locks your registry using a Windows feature which was abandoned and few people even know about it. That is why you won’t be able to change the password using some other tools. Luckily, this process should be easy enough since your computer has the recent registry copy available somewhere in its system files.
You need to know that you will need to somehow gain access and browse the files on your hard drive without booting to the OS. This can essentially be done in two ways: either you take out the hard drive and connect it to a working computer or you can follow our steps to do so on the same computer. We chose to present this solution as getting the hard disk out can void your warranty if you are using a laptop and sometimes it can’t be done at all.
In order to follow the steps in this solution, you will need to use or creaty a recovery media for the OS you are using. This is usually the DVD from which you installed your OS from. However, Windows 10 users have the option of creating one manually if they need to and they can even use an USB drive.
Download the Media Creation Tool software from Microsoft’s website. Open the downloaded file you just downloaded and accept the terms and conditions.
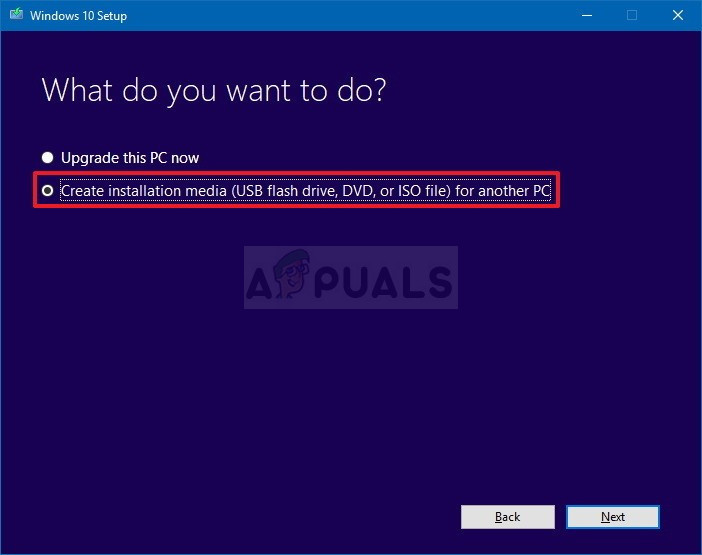
- Select the Create installation media (USB flash drive, DVD, or ISO file) for another PC option from the initial screen.

- The language, architecture, and other settings of the bootable drive will be chosen based on your computer’s settings, but you should uncheck the Use the recommended options for this PC in order to select the correct settings for the PC which has the password attached to it (if you are creating this on a different PC, and you probably are).
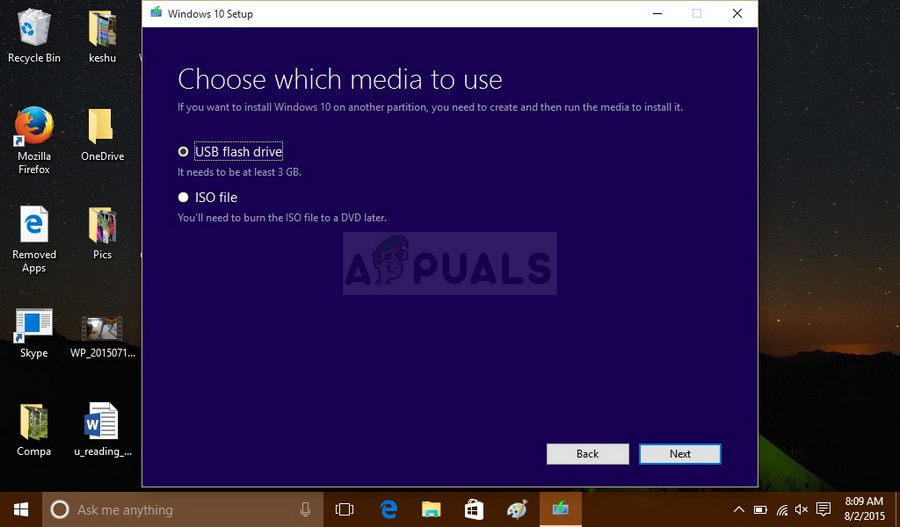
- Click Next and click on the USB drive or DVD option when prompted to choose between USB or DVD, depending on which device you want to use to store this image on.

- Click Next and choose the USB or DVD drive from the list which will show the storage media connected to your computer.
- Click Next and the Media Creation Tool will proceed to download the files necessary to install create the installation device.
Now that you have this recovery DVD for Windows 10 as well, follow the steps below according to your version of Windows order to navigate to Command Prompt without the need to boot into your OS first:
- Insert the installation drive you own and start your computer. The following steps are different from one OS to another so follow them accordingly:
- WINDOWS XP, VISTA, 7: Windows Setup should open prompting you to enter the preferred language and time and date settings. Enter them and choose the Repair your computer button at the bottom of the window. Keep the initial radio button selected when prompted with Use recovery tools or Restore your computer and click on the Next button. Choose Command Prompt when prompted with the Choose a recovery tool selection.
- WINDOWS 8, 8.1, 10: You will see a Choose your keyboard layout window so choose the one you want to use. The Choose an option screen will appear so navigate to Troubleshoot >> Advanced Options >> Command Prompt.

- Once Command Prompt opens, enter the command presented below and click Enter afterwards:
Notepad
- Notepad should open now so click on File >> Open from the top right menu and wait for Windows Explorer window to open. Make sure you choose the All Files option under Files of type in order to see all files.
- This workaround will do great for what we are about to do as you can see everything connected to your computer. Just make sure you don’t double-click on any file which will cause Notepad to try an open it.
- Navigate to the System Volume Information folder in This PC/My Computer >> Your Main Hard Drive.

- Locate the _restore… folder where the three dots stand for a bunch of letters and numbers and open that folder. The folder will contain several other folders so make sure you sort them by the Date Modified so that you can see from when these backups come from. Make sure you choose the date when the infection still didn’t appear.
- Open that folder and look for the files displayed below. These files are the ones we are going to back up and they belong to the registry. While looking for them, make sure you rename them as it’s presented below:
_REGISTRY_USER_.DEFAULT” to “default”
_REGISTRY_MACHINE_SECURITY” to “security”
_REGISTRY_MACHINE_SOFTWARE” to “software”
_REGISTRY_MACHINE_SYSTEM” to “system”
_REGISTRY_MACHINE_SAM” to “sam”

- Now select these five files and copy them to the Windows\system32\config folder in the drive where your Windows OS installation is located and make sure you overwrite the existing files. You have now backed up your registry to the date you chose. Boot your computer and check to see if you are still presented with the password window. If you are, try repeating the same process but choosing an older version of the registry.
You can also read our article on removing startup password using RegistryEditor ISO
The post Fix: This Computer is Configured to Require a Password in Order to Start Up appeared first on Appuals.com.


No comments