Fix: Safe Search Won’t Turn Off in Microsoft Edge and IE
Safe Search is a built-in security feature that filets out inappropriate web content. Although it used to be quite easy to disable or enable Safe search for Internet Explorer, the default behavior has changed with the launch of Windows 10.
Even though the Edge browser includes a setting that allows users to disable Safe Search, for some users Safe Search refuses to be disabled due to a glitch, child account type or browser setting. Here’s the error message that most affected users see after being unable to disable SafeSearch:
“We’ve set SafeSearch to strict because your browser communicated your preference for a safe web browsing experience”

Some users have been reaching us with questions after being unable to disable Safe Search for Microsoft Edge and/or Internet Explorer. Whenever this issue occurs, the user is unable to disable Safe for multiple search engines including Bing, Google or Yahoo. The restriction also applies to Youtube and a few other content websites.
As per most user reports, this particular issue is either caused by an internal Edge bug or by the fact that the current account is enabled as a child account with limited privileges.
If you’re currently struggling to turn off Safe Search for Microsoft Edge or Internet Explorer, this article will give you some basic troubleshooting guides. Please follow the methods below in order until you stumble upon a fix that resolves the Safe Search won’t rurn off issue.
Method 1: Turning Safe Search Off from inside the Search Engine’s Settings
Before we dig into other troubleshooting guides, let’s see if you’re trying to turn off Bing’s SafeSearch setting from the right menu. Since disabling or enabling SafeSearch is no longer done through your browser settings, you’ll need to navigate to the home page of your search engine.
Please follow the guide specific to your preferred search engine to turn Safe Search Off.
Here’s a quick guide on turning Bing SafeSearch on or off for the Bing search engine:
- Open Internet Explorer or Edge Browser and navigate Bing.com.
- Make sure you are signed in with your user account, then click on the action button (top-right corner) and click on Settings.

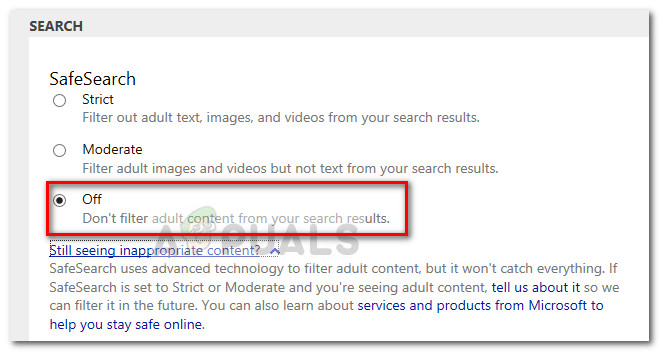
- In the Settings menu of Bing, go to the Search section and set SafeSearch to Off.

- Hit Save button at the bottom of the menu and see if Safe Search is now disabled when using Bing.
Here’s a quick guide on how to disable Safe Search for Google search engine:
- Open Microsoft Edge or Internet Explorer and access the Google Search Engine.
- Make sure you are logged in with your Google account and search for something.
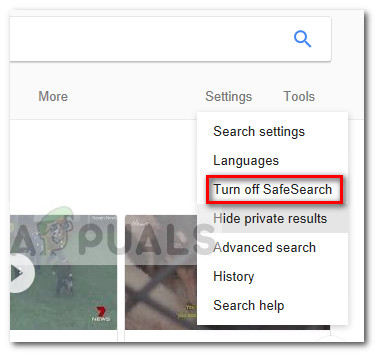
- Above the search results, click on Settings and then choose Turn off SafeSearch.
 In the event that this method wasn’t effective in disabling Safe Search, move down to the next method below.
Method 2: Apply all pending Windows updates
If the first method wasn’t effective, let’s eliminate the possibility of an internal bug. The inability to turn off Safe search is a known Windows 10 bug that Microsoft has already addressed with a couple of hotfixes.
If you’re unable to turn Safe Search off due to Windows 10 glitch, applying all the pending Windows updates will automatically resolve the issue. Here’s a quick guide on applying all the pending Windows updates:
- Press Windows key + R to open up a Run box. Next, type “ms-settings:windowsupdate” and hit Enter to open the Windows Update tab from the Settings menu.

- In the Windows Update screen, click the Check for updates button and wait until the analysis is complete.
- Once Windows figures out which updates need to be applied and their order, start following the on-screen prompts to apply them to your system. Keep in mind that depending on how many pending updates you have, your PC might restart several times.
- After every startup, return to the Windows Update screen and install every pending update until there is none left.
- Once all updates are installed, perform a final restart. At the next startup, see whether you are able to disable Safe Search. If the feature is still refusing to be turned off, continue down with the next method below.
Method 3: Disabling Safe Search via the InPrivate mode
Some users have managed to disable Safe Search by using the InPrivate mode. In the instance that the Safe Search setting is locked to Strict or Moderate, you can try to modify the setting from an InPrivate mode in the Edge browser.
Here’s a quick guide on disabling Safe Search from an InPrivate window of Microsoft Edge:
- Open Microsoft Edge and press Ctrl + Shift + P to open a new InPrivate window.
- In the newly opened InPrivate window, navigate to the search engine of your choice, and follow Method 1 again to disable Safe Search (while in an InPrivate window).
If disabling Safe Search from an InPrivate window wasn’t effective, move down to the final method.
Method 4: Creating a new Windows user account
Some users have finally managed to resolve the issue and disable Safe Search after creating a new Windows user account. As it turns out, Windows 10 is capable of overriding the Safe Search settings of your search engines if the active account is enabled as a child of another one.
In this case, the solution would be to create a new user account and grant it administrative privileges. Here’s a quick guide on how to do this:
- Press Windows key + R to open up a new Run box. Then, type “netplwiz” and hit Enter to open up the User Accounts window.

- In the User Accounts window, expand the Users tab and click the Add button.
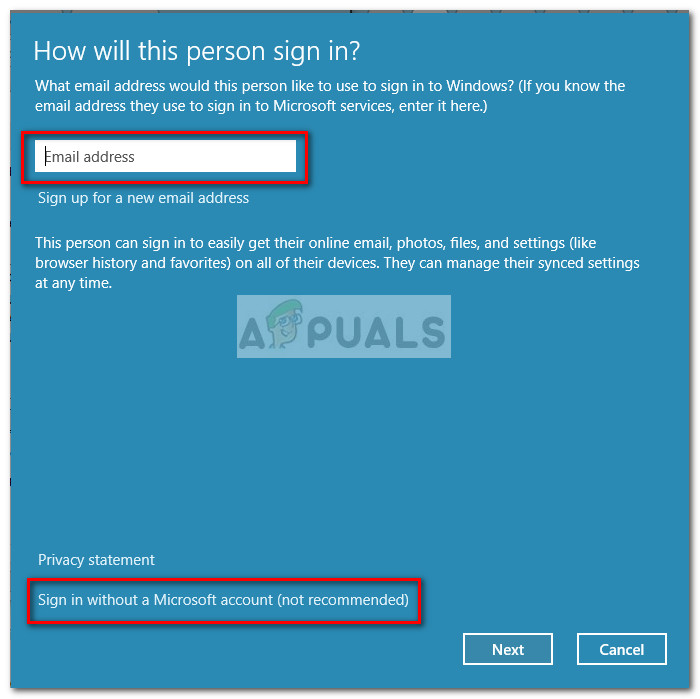
- In the next window, click on Sign in without a Microsoft account to proceed.

- Then, click on Local Account and hit the Next button.
- Insert your account name and password and hit the Next button again to complete the process.
- Sign-in with your newly created user account either by logging out or by restarting your PC and see if the Safe Search won’t Turn Off issue has been resolved.
The post Fix: Safe Search Won’t Turn Off in Microsoft Edge and IE appeared first on Appuals.com.


No comments