How to Fix CS:GO Crashes, Freezes and Black Screen Issues
Counter Strike Global Offensive (CS-GO) is one of the most popular first person shooter games available for PC and it’s a sequel to Counter Strike 1.6. The game itself is not very demanding for the computer and it can run it easily but constant crashes, freezes and black screen issues takes the fun away.

Here are some similar errors which share similar causes and solutions as the problem regarding constant crashes we are describing in this article:
- CS:GO has stopped working: This issue occurs when CS:GO either at the launch or in the middle of game stops working all of a sudden, and may also display a message saying “CS:GO has stopped working”
- CS:GO Black Screen: Most likely due to GPU but this happens when the screen turns black also known as KSOD, Black Screen of Death.
- CS:GO Freezing in the Middle of the Match with Sound Looping: This happens when the Game freezes and sound continues to loop.
- CS:GO Keeps Crashing: No matter what has been done, the game crashes either at startup or in the middle.
How to Fix CS:GO Crashes, Freezes and Black Screen Issues
The causes are different for various scenarios but the game usually just crashes without an error code or really anything you can analyse to make the problem go away. Luckily, we have prepared certain methods which should help you deal with the problem easily!
Solution 1: Turn off Compatibility Mode and Delete the Executable
If you have turned on compatibility mode for Counter Strike Global Offensive as a part of another process or if it’s turned on as a side-effect of other processes, you should definitely consider disabling this option and try running the game again to see if the crashes still occur. This method is probably the easiest so make sure you check this one out first.
- Locate the Counter Strike Global Offensive shortcut on the Desktop or look for the original executable available in the folder where you have installed the game.
- You can also search for the game by clicking the Start menu button or the search button next to it and beginning to type. Anyway, right-click on the executable and choose the Delete option from the context menu which will appear.
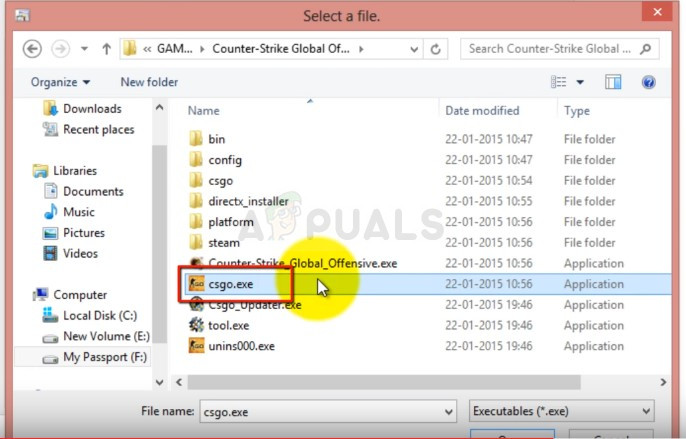
- After that, open up your Steam client by double-clicking its icon from the Desktop or by searching for it in the Start menu or the search bar next to it.
- Navigate to the Library tab in the Steam client, and locate Counter Strike Global Offensive in the list of the games you have installed in your library.
- Right-click on CS:GO and choose the Properties option from the context menu which will appear. Navigate to the Local Files tab in the Properties window and click the Verify Integrity of Game Files button.
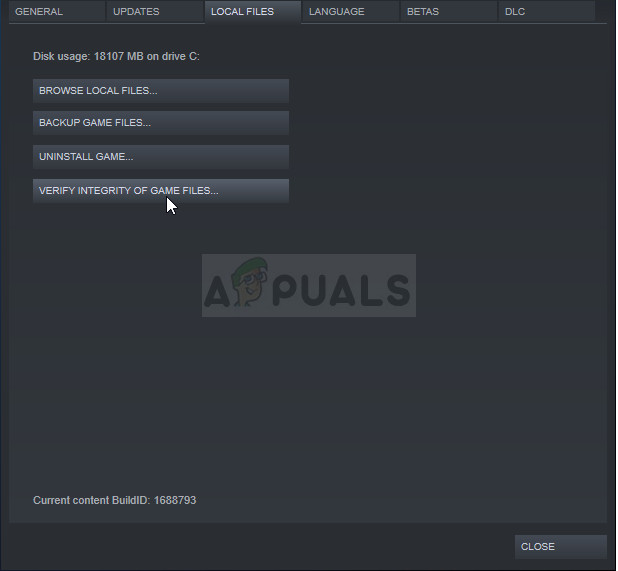
- It should start automatically and it will scan your game for missing files and redownload the executable you just deleted. Head back to the executable’s folder in Steam >> steamapps >> common >> Counter Strike Global Offensive (if you are using the default library).
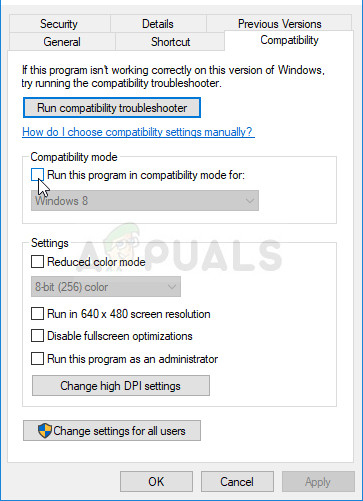
- Navigate to the Compatibility tab in the Properties window and uncheck the box next to the “Run this program in compatibility mode for:” option under the Compatibility mode section.
- Click on either OK or Apply and restart your computer just to make sure the changes have been applied. Check to see if the problem is gone now.
Solution 2: Tweak the CFG Folder
Sometimes the change in certain game settings can bring the whole game to its knees and errors are bound to occur. Sometimes a game update changes these settings in a way which your computer can’t handle and your only choice it to reset these settings somehow. There are two ways to do so:
- Navigate to your Steam installation folder. If you haven’t configured any changes during the process of installation regarding the required installation folder, it should be Local Disk >> Program Files or Program Files (x86).
- However, if you have the Steam program’s shortcut on the desktop, you can simply right-click on it and choose the Open file location option from the context menu which will appear.
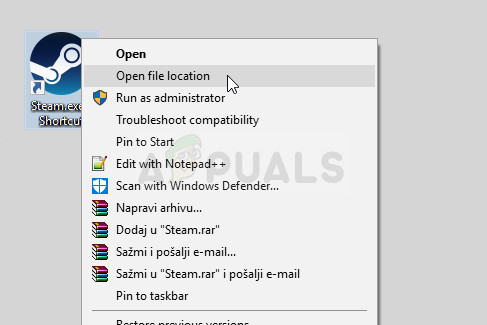
- Furthermore, navigate to steamapps >> common and look for the Counter-Strike Global Offensive folder. Navigate to csgo folder.
- Locate the folder named cfg in the csgo folder, right-click on it, and choose the Rename option from the context menu.
- Rename to folder to something like cfg.old and confirm the changes. Start the game again and configure your settings properly again, avoiding the crashes.
Alternative:
- Navigate back to the csgo folder in Counter Strike’s installation folder and open the cfg folder. Locate a file called “valve.rc”, right-click on it, choose Rename, and change its name to “valve.old.rc”.
- Start the game and check to see if the error still appears.
Solution 2: Add Some Launch Options
The “autoconfig” launch option in Steam can be used to get rid of both crashed and various black screens which might appear when you start the game up. This is aimed at users who installed the game via Steam and this method is easy enough to not skip it during your troubleshooting process.
- Open up Steam by double-clicking its icon from the Desktop or by searching for it in the Start menu or the search bar next to it.

- Navigate to the Library tab in the Steam window, and locate Counter Strike Global Offensive in the list of the games you own in your library.
- Right-click on CS:GO and choose the Properties option from the context menu which will appear. Stay in the General tab in the Properties window and click the Set launch options button.
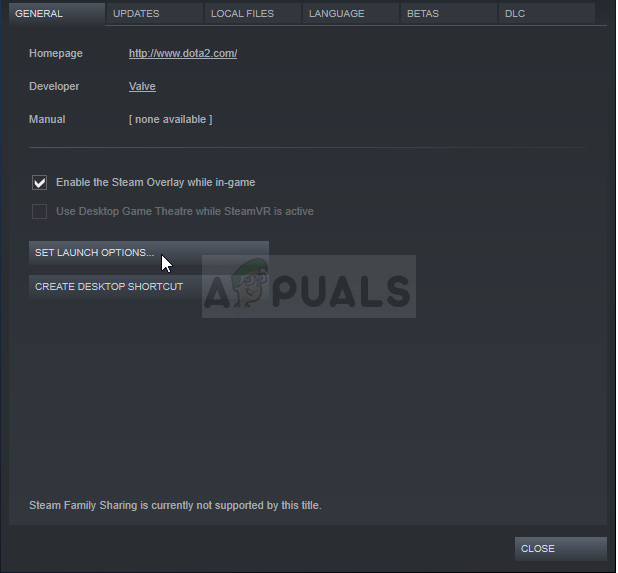
- Type in “-autoconfig” in the Launch Options window. If there were some launch options from before in the window, make sure you separate them by a space. Check to see if CS:GO still crashes on your computer.
- If this launch methods does not provide good results, try adding this one as well: “cl_disablehtmlmotd 1”
Solution 3: Stop Overclocking Your Graphics Card
Overclocking is a technical process where users change the maximum frequency of the graphics of central processor to a greater value which is above the recommended factory setting. This can give your PC a significant performance and speed boost but you have to absolutely careful since there were situations where entire rigs broke down and even ended up in smoke.
Some CPUs and GPUs were definitely not made to be overclocked and it’s a fact that some models outperform others. What’s even more important is that different tools used to overclock your processors (CPU or GPU) work better or worse depending on the processor which is being used.
Returning your processor’s frequency to its original state depends on which software you used to overclock it in the first place. Intel and AMD have their own applications available to download which let users overclock their CPUs but they sometimes implement factory overclock settings which are activated when, for example, running the CS:GO. Check to see if the crash still occurs while playing CS:GO.
Solution 4: Disable Steam Shared Pre-Caching
Your Steam client can now help you load certain games faster and more smoothly. The new shader pre-caching feature, which went live for Beta Steam users in November and now comes to all users via the latest client update, allows Steam to download pre-compiled shader code for OpenGL and Vulkan games. So instead of making your PC compile high level shader code into a version optimized for your GPU, Steam will snag it for you before you ever launch the game.
The real problem is that his feature, no matter how amazing it sounds, sometimes causes various video games to crash and CS:GO is no exception. There are plenty of users who claim that they were able to solve the problem simply by disabling this setting in Steam options.
- Open up Steam by double-clicking its icon from the Desktop or by searching for it in the Start menu or the search bar next to it.
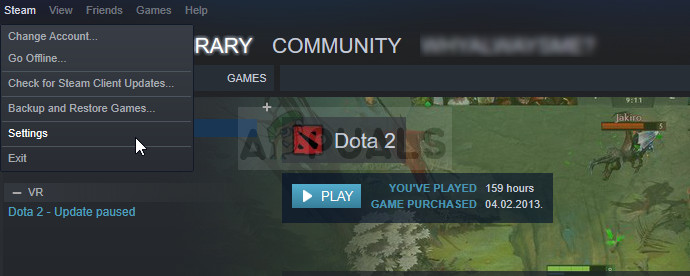
- From the menu at the top of the window click on Steam and select Settings from the dropdown menu.
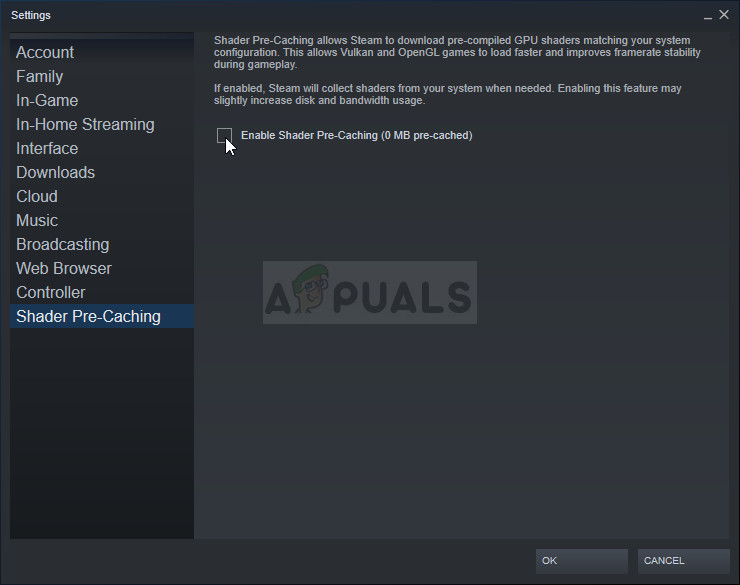
- From the left side navigation pane, click the Shader Pre-Caching button and uncheck the box next to the “Enable Shader Pre-Caching” option at the right side of the screen.
- Make sure you exit the Steam client completely by clicking Steam >> Exit from the top-side menu or right-click the Steam icon at the lower right part of the screen (system tray) and choose Exit. Check to see if crashes still occur.
Solution 5: Uninstall the Latest Windows Update
It appears that several users started to experience the same problem after the last Windows Update and it appears to have messed up certain in-game settings. This is a bad thing as Windows updates are supposed to bring fixes and performance improvements but the best thing you can do is to uninstall the latest update and hope that Windows will release a new one.
- Click the Start menu button and try to open Control Panel by typing it and clicking the first option at the top. Also, you can click the gear icon to open the Settings app since you are probably using Windows 10.
- If you are using Control Panel, switch to View as: Category at the top right corner and click on Uninstall a Program under the Programs area. At the right side of the screen, you should see the View installed updates button so click on it.

- If you are a Windows 10 user using the Settings app, click the Update & Security button and navigate to the Windows Update tab. Scroll down until you see the View update history button and click on it.
- A new screen should now appear and you should see the Unnstall updates button at the top so click on it.

- Either way, you should now be able to see the list of installed updates for your computer. Check the Microsoft Windows section at the bottom for updates which may have affected your CS:GO game and caused constant crashes.
- Scroll to the left in order to see the Installed on column which should display the date when the update was installed so make sure you uninstall the lates one by date.

- Click on the update once and choose the Uninstall option at the top and follow the instructions which will appear on screen in order to get rid of the update.
- Wait for Microsoft to release a new update which should be installed automatically.
Solution 6: Disable Multi-Core Rendering
Even though this option is supposed to make your in-game experience easier and smoother, for some users it has represented a nightmare which often crashed their game during a match but they didn’t know what to blame. Luckily, some people have decided to share this solution and you should definitely try this if the methods above have failed.
- Open up Steam by double-clicking its icon from the Desktop or by searching for it in the Start menu or the search bar next to it.

- Navigate to the Library tab in the Steam window, and locate Counter Strike Global Offensive in the list of the games you own in your library.
- Right-click on CS:GO and choose the Play Game option. After the game opens, click on Options from the top menu in the game. Select Video Settings from the dropdown menu.
- In the Video Settings window, check under Advanced Video Options for the Multicore Rendering setting and click the arrow next to it to switch it to Disabled. Click the Apply button at the bottom right screen.

- Restart the game to apply the changes and check to see if crashes still occur.
Solution 7: Use Older NVIDIA Drivers
Users have reported that the new 396.24 and 396.18 NVIDIA drivers actually started causing constant CS:GO crashed on their computers. This goes to show that new is not always better and that an “update” can sometimes make things even worse. To deal with the problem temporarily (until NVIDIA publishes new drivers) you can use the 390.xx drivers which run the game properly.
- Click the Start menu at the lower left part of your desktop, type in “Device Manager” with Start menu open, and it should appear at the top so make sure you click on it. You can also click Windows Key and ‘R’ key at the same time in order to open the Run dialog box. Type in “devmgmt.msc” in the box and click OK in order to run it.

- Since it’s the graphics card driver you want to replace on your computer, expand the Display adapters category, right click on your video card and select the Uninstall Device option.

- Confirm any dialogues which may ask you to confirm the deletion of the current video driver and wait for the process to finish.
- Look for 390.xx drivers for your respective graphics card. It should be available on NVIDIA’s website but you should also gather some basic information about your setup in order to download the proper driver suitable for you. At this link, you will be able to find the advanced driver search page.

- Make sure you fill out the information about your graphics card, your operating system you have installed, and choose Recommended/Certified under the Recommended/Beta option. Locate and download the 390.xx driver for your graphics card.
- Locate the file you just downloaded in your Downloads folder, double-click on it, confirm some security prompts, and follow the instructions on screen to install this driver. Check to see if CS:GO still crashes.
The post How to Fix CS:GO Crashes, Freezes and Black Screen Issues appeared first on Appuals.com.


No comments